
Section 5 - Hello World#
Introduction#
In this section we will be following along with and completing course material from the Pentester Academy’s SecurityTube Linux Assembly language Expert 64 Bit course. The second assignment is writing a Hello World program in 64 Bit assembly language. It is to be coded, assembled, linked and run. Execution is then to be monitored via GDB. We will use the GEF add-on for GDB to enhance the visual presentation from GDB.
Project code is contained in my github.
Lesson Content#
The Program helloworld.asm#
The screenshot below displays the contents of the program helloworld.asm. The program contains a string called hello_world that holds the string Hello World to the SLAE-64 Course. A new line is added by appending the 0x0a ASCII character. We need to assemble, link, run and instruction step this program in GDB.
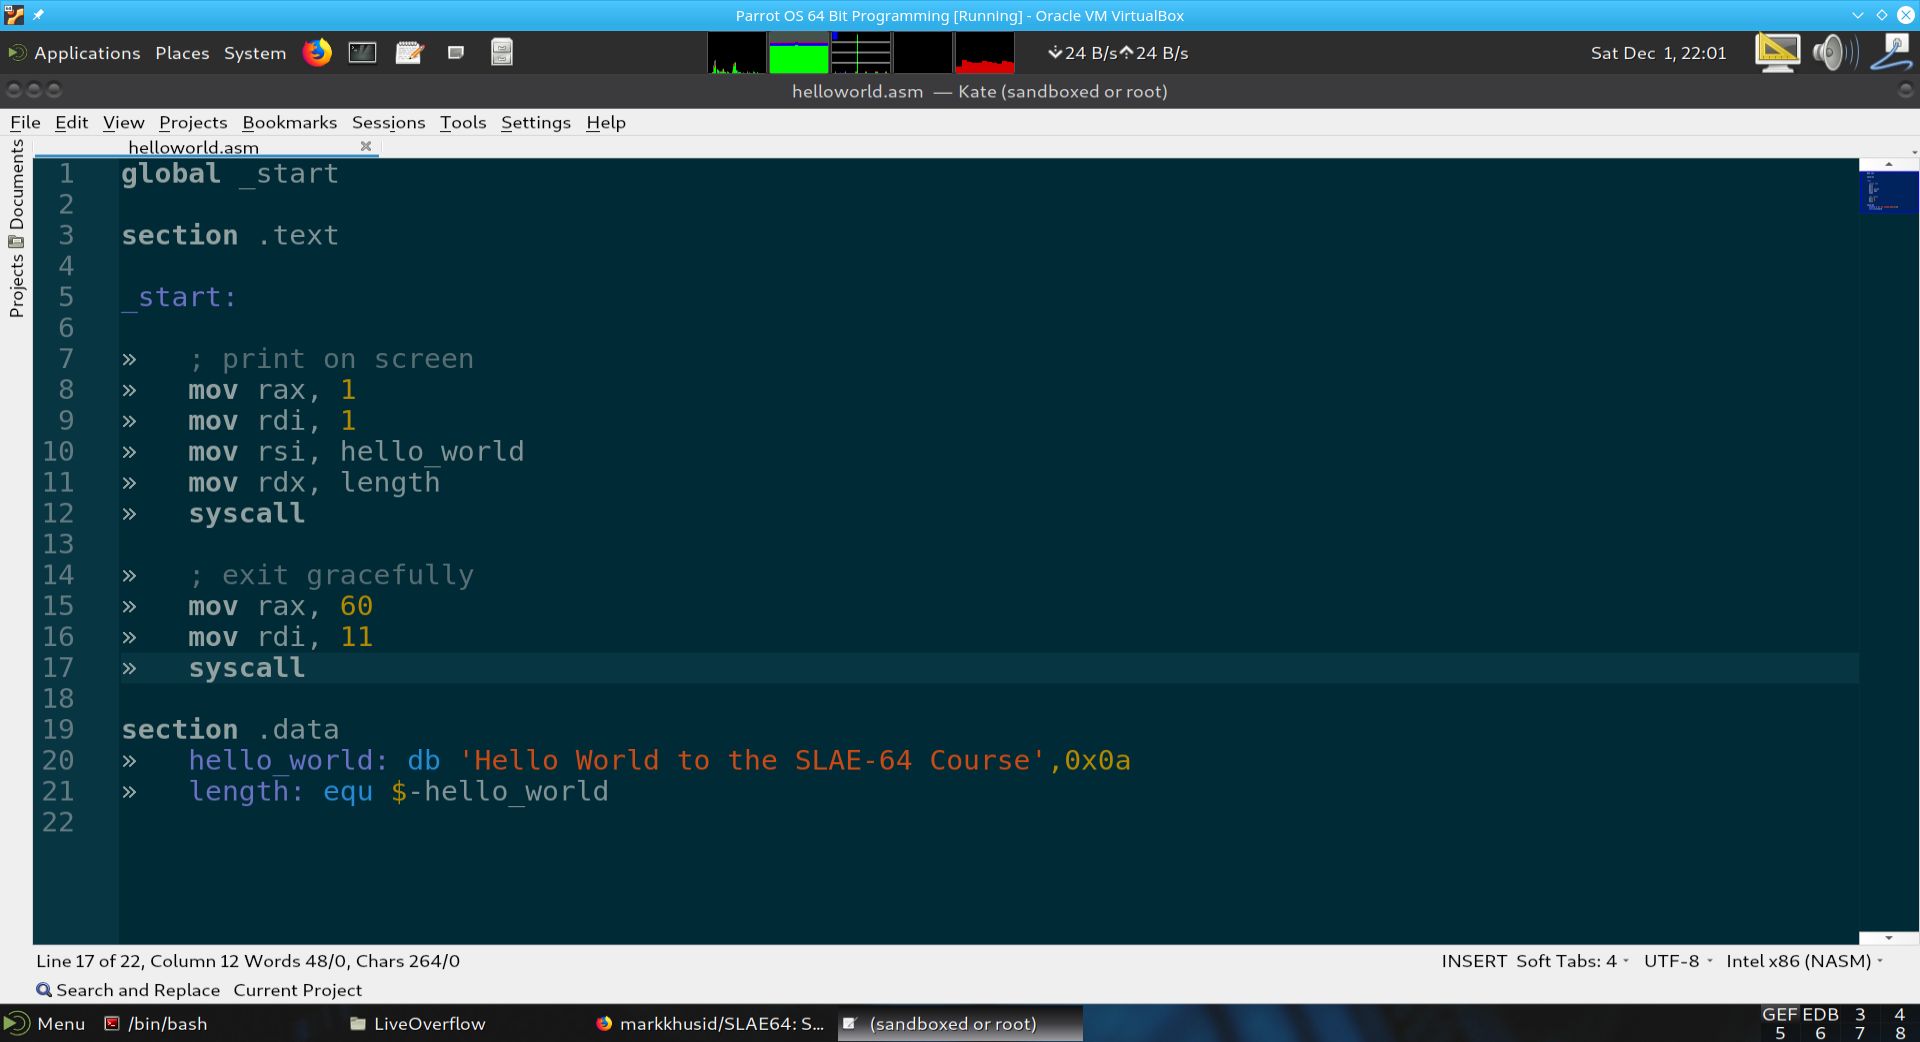
Fig. 59 The program helloworld.asm#
Assembling, Linking and Running the Program helloworld.asm#
The program is assembled with:
$ nasm -felf64 helloworld.asm -o helloworld.o
And linked with:
$ ld helloworld.o -o helloworld
We then run the executable and look at it’s objdump. The results of these operations is shown below:
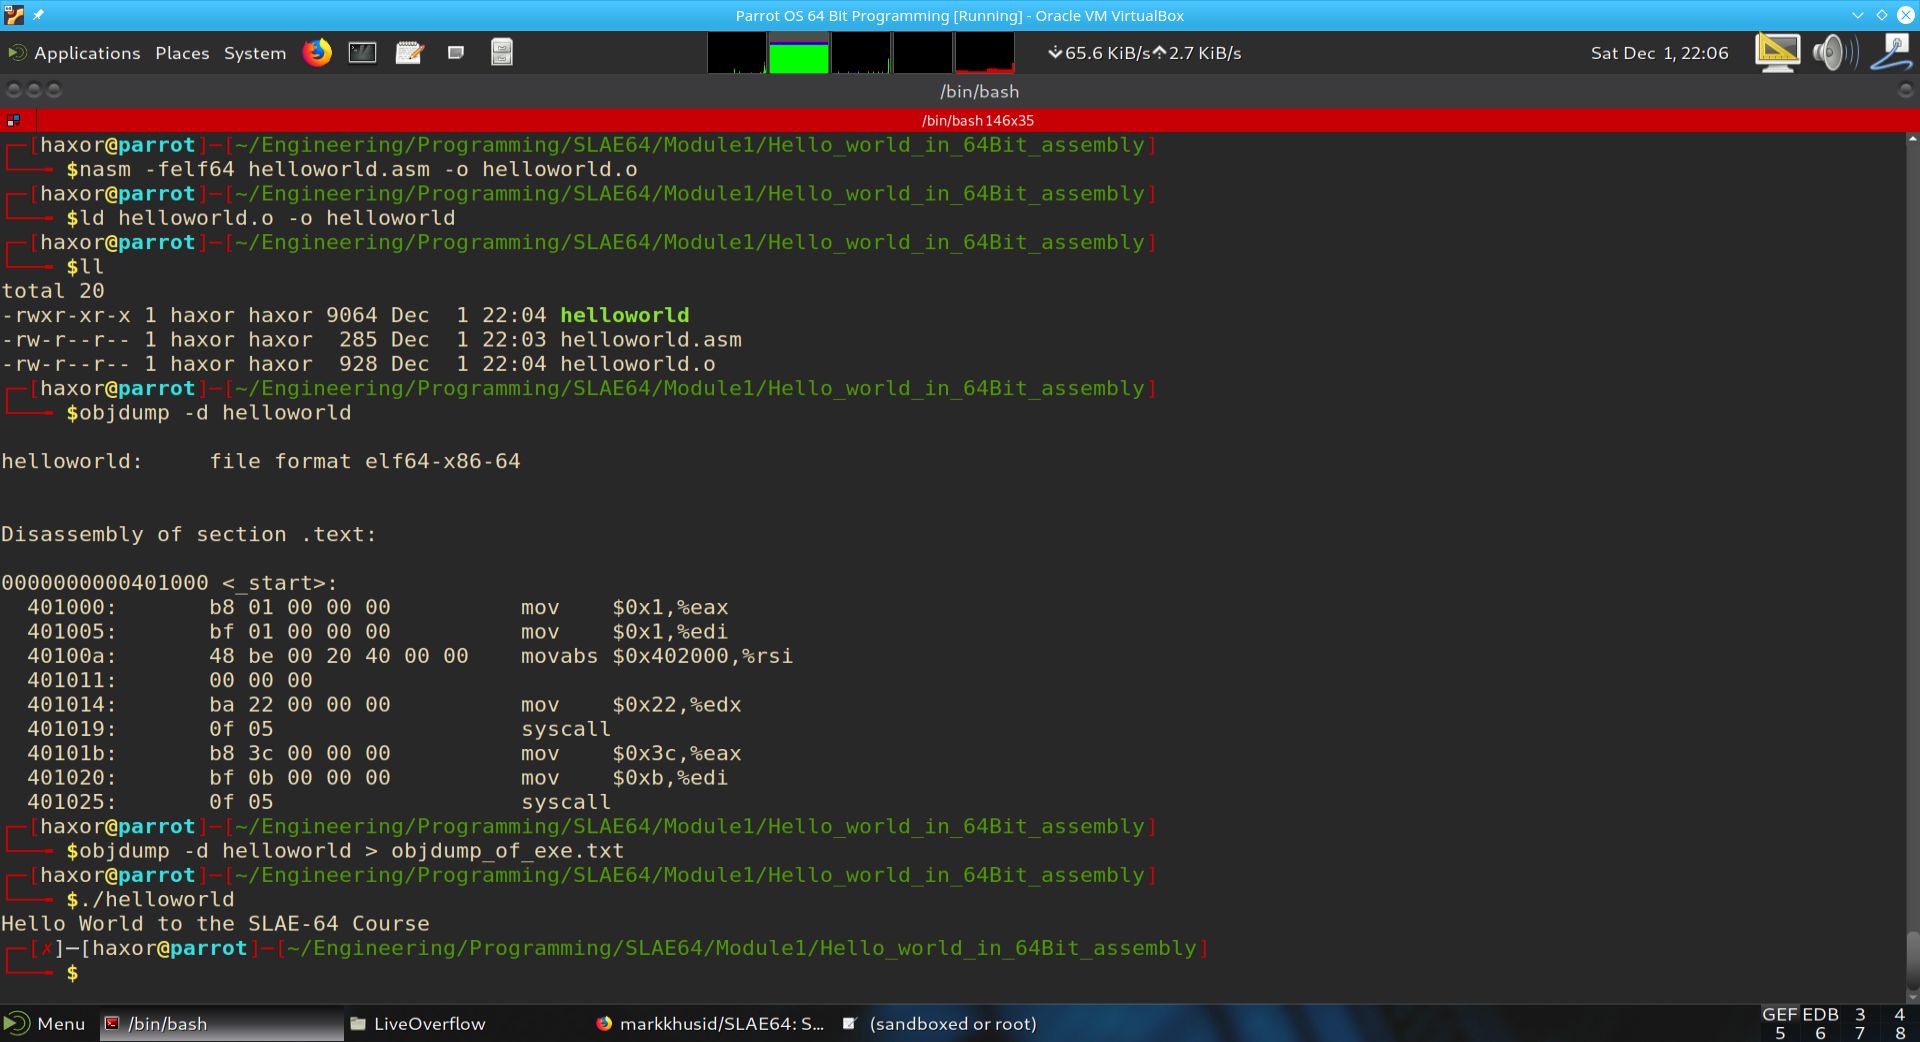
Fig. 60 Assembling, Linking and Executing the Program helloworld.asm#
In the above screenshot, we assemble and link the program. We then use the objdump tool to look at the opcodes within the .text section by using the -d switch. Finally the program is run using:
$ ./helloworld
The ./ is needed because the executable is not in a directory listed in the PATH environment variable.
In the objdump of the executable, we notice large amounts of null bytes (i.e. 00). These are not good for shellcode, since in many cases, a victim process encountering a null byte as input understands the null byte as an end of the input. This would prematurely end the victim program from receiving all of the shellcodes contents.
In further videos in this course, the instructor shows how to remove these null bytes, while still maintaining the same functionality in the executable.
Running helloworld in GDB + PEDA#
Setup and before run:#
The screenshot below shows the setup of the GDB debugger with the PEDA add-on. The program helloworld is loaded into GDB. The program is then run and the state of the registers and stack are shown.
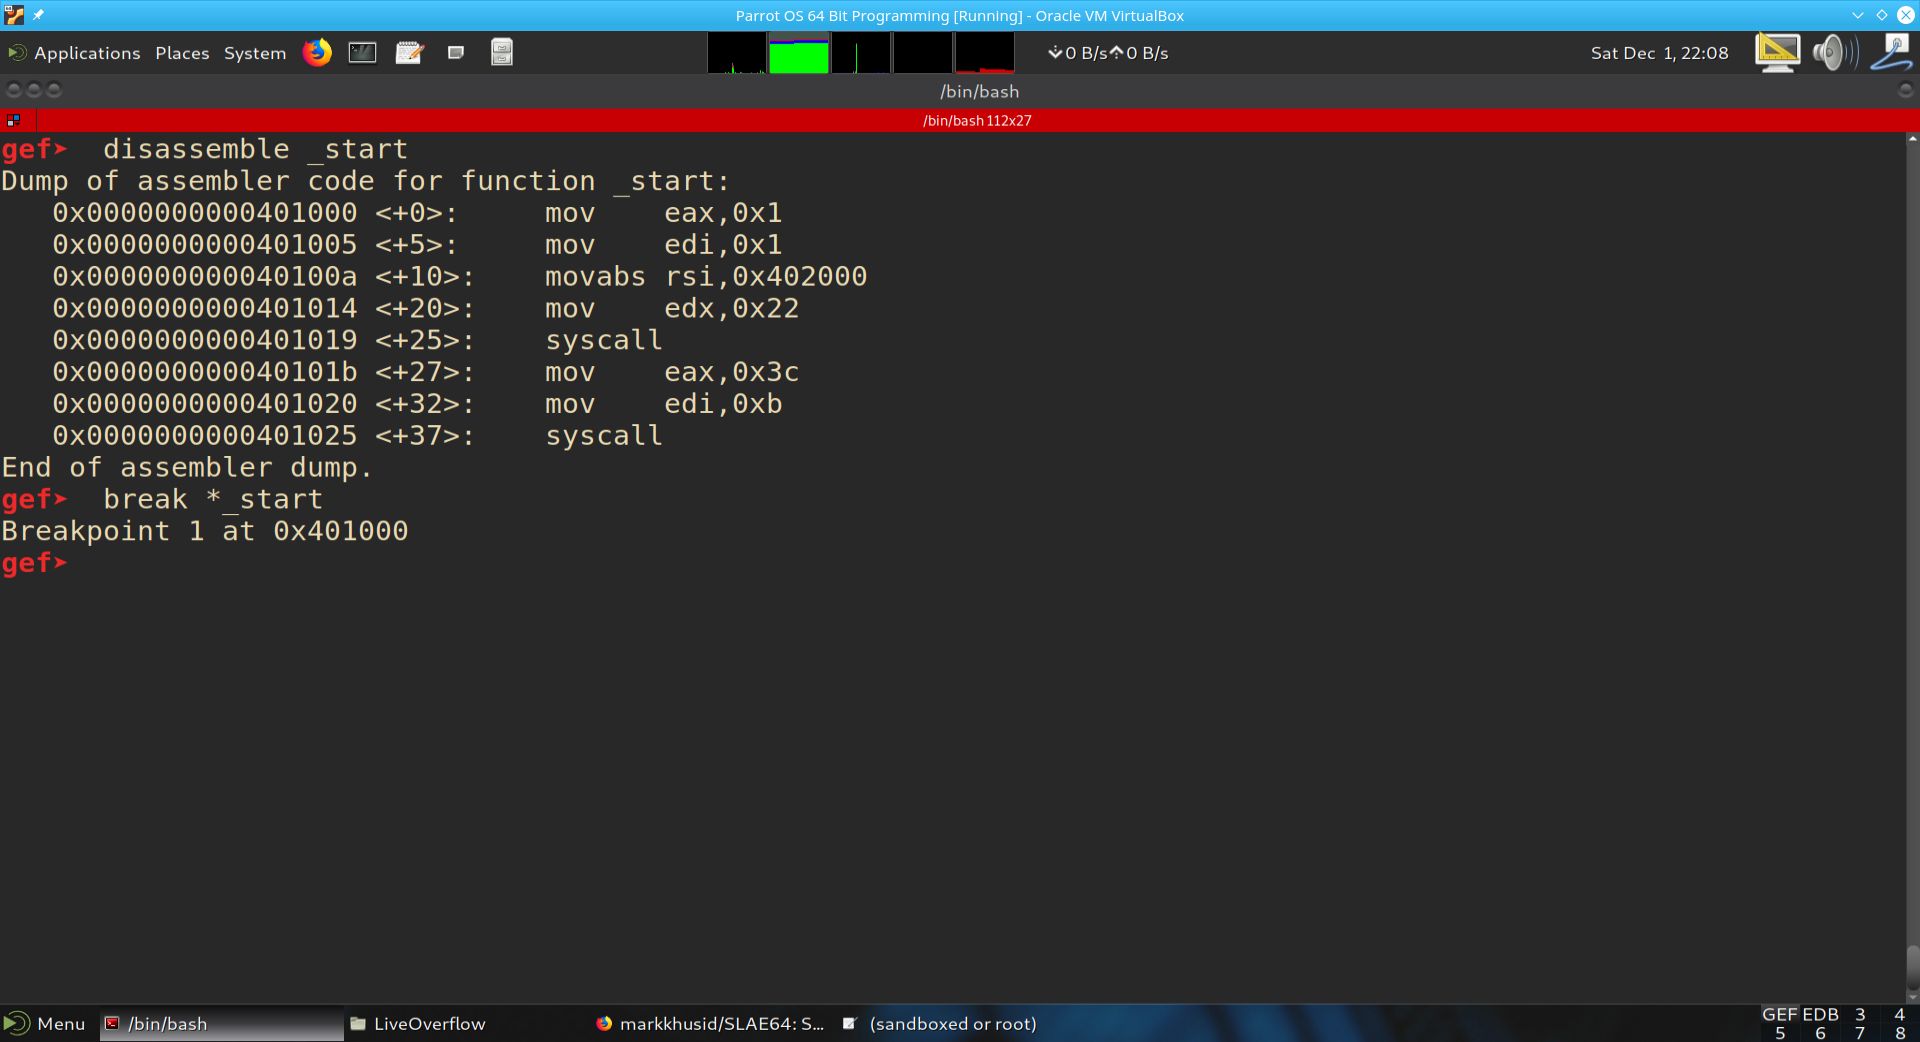
Fig. 61 helloworld in GDB before run#
From the disassembly of the _start function above, we can notice a difference between our written code and the disassembly of the _start function. Namely, rather than involving the 64-bit versions of the registers, the assembler optimized away usage of those in favor of the 32-bit versions. For example, the register RAX was replaced with EAX.
From a functionality point of view, this is a moot point. However, from a shellcoding perspective, it is desireable to have complete control over how the actual opcodes are produced.
In the next sections, we will step through the code and describe what occurs.
Running step 0x401000 <_start>: mov eax,0x1#
Prior to running mov eax, 0x1, the state of the registers and stack is shown below:

Fig. 62 Before running step 0x401000 <_start>: mov eax,0x1#
The mov eax, 0x1 instruction simply moves the immediate value 1 into the 32-bit register eax.

Fig. 63 After running step 0x401000 <_start>: mov eax,0x1#
The mov eax, 0x1 instruction moved the immediate value 1 into the 64-bit register rax, as can be seen in the screen shot above. The purpose of moving the immediate 1 into eax is to set up the write system call. If you recall, the system calls are enumerated in:
/usr/include/asm/unistd_64.h
A portion of this file is shown below:
$ more /usr/include/asm/unistd_64.h
#ifndef _ASM_X86_UNISTD_64_H
#define _ASM_X86_UNISTD_64_H 1

#define __NR_read 0
#define __NR_write 1
#define __NR_open 2
#define __NR_close 3
#define __NR_stat 4
#define __NR_fstat 5
#define __NR_lstat 6
#define __NR_poll 7
#define __NR_lseek 8
#define __NR_mmap 9
#define __NR_mprotect 10
#define __NR_munmap 11
#define __NR_brk 12
#define __NR_rt_sigaction 13
As can be seen from the file contents above, the number 1 is associated with the WRITE system call. Note that I have looked at the 64-bit version of the file. There also exists a 32-bit version, which we will not be using since this is 64-bit code.
Executing step 0x401005 <_start+5>: mov edi,0x1#
Prior to executing the instruction mov edi,0x1, the state of the registers and stack are as shown below:
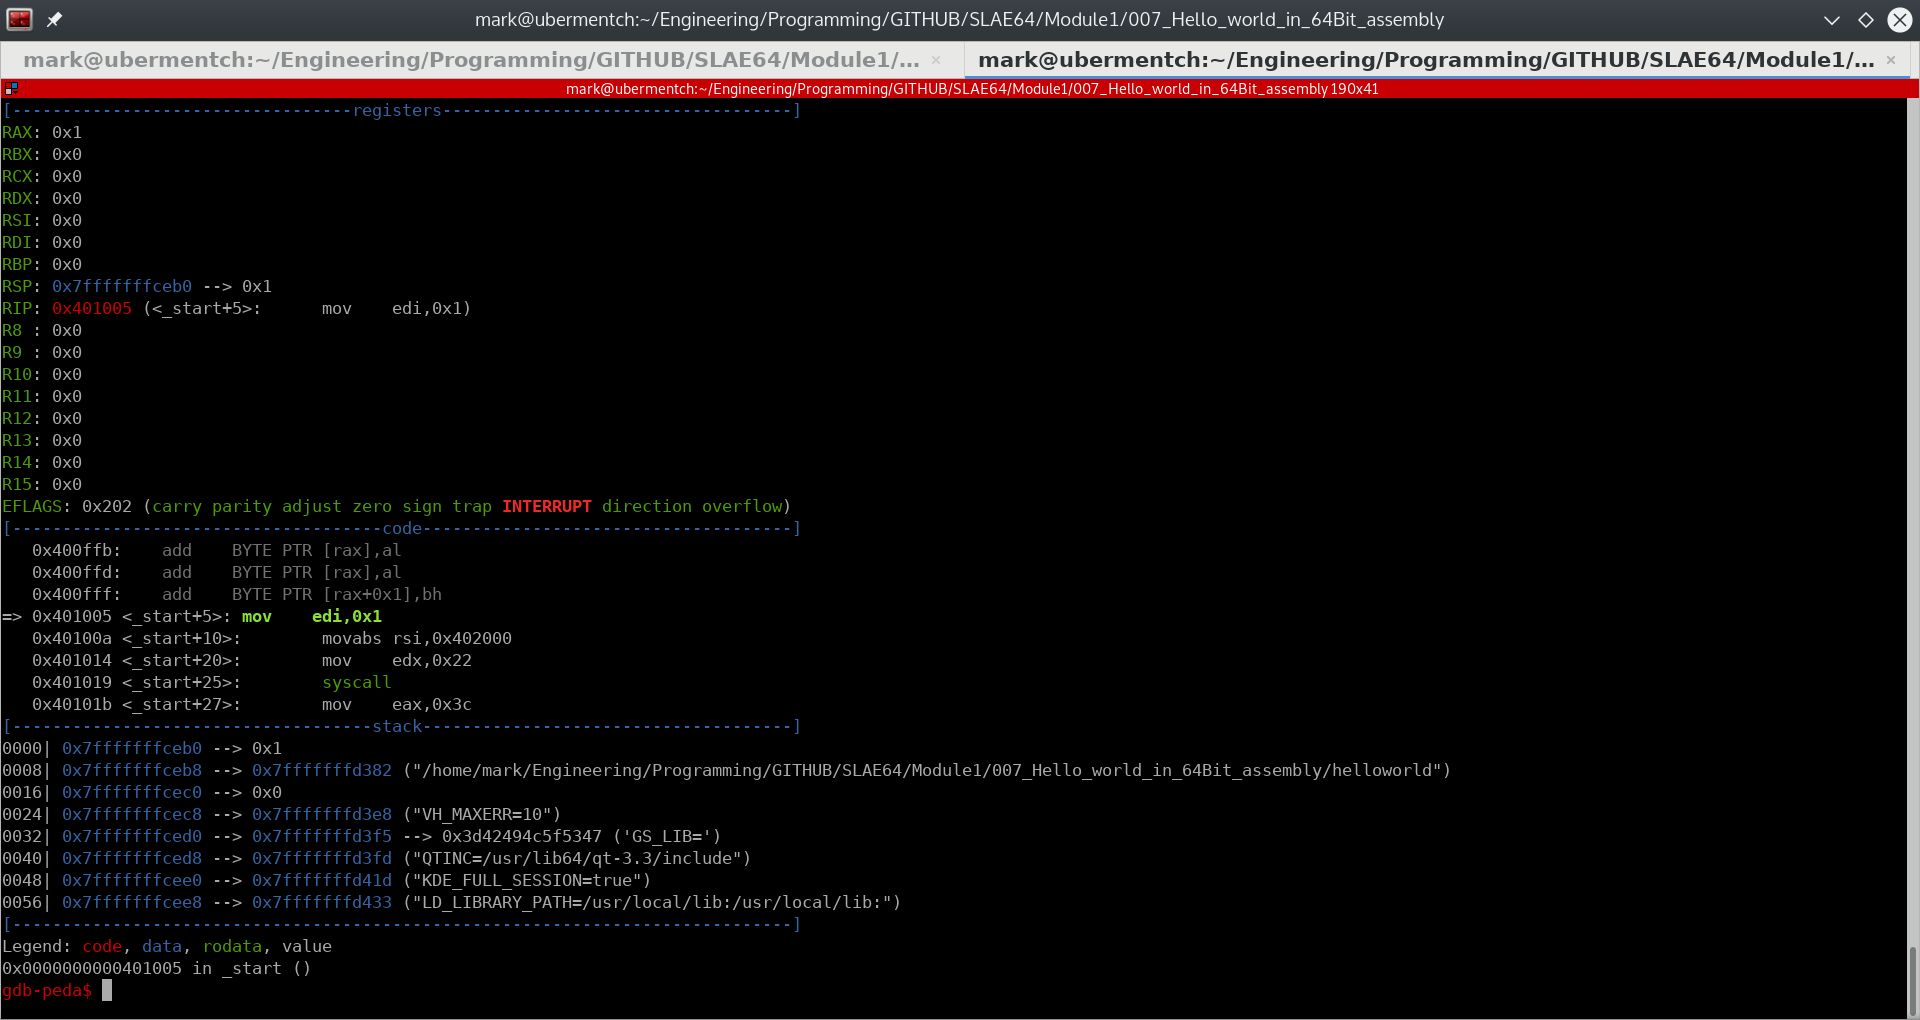
Fig. 64 Before running step 0x401005 <_start+5>: mov edi,0x1#
The instruction mov edi,0x1 simply moves the immediate value 1 into the 32-bit register edi.
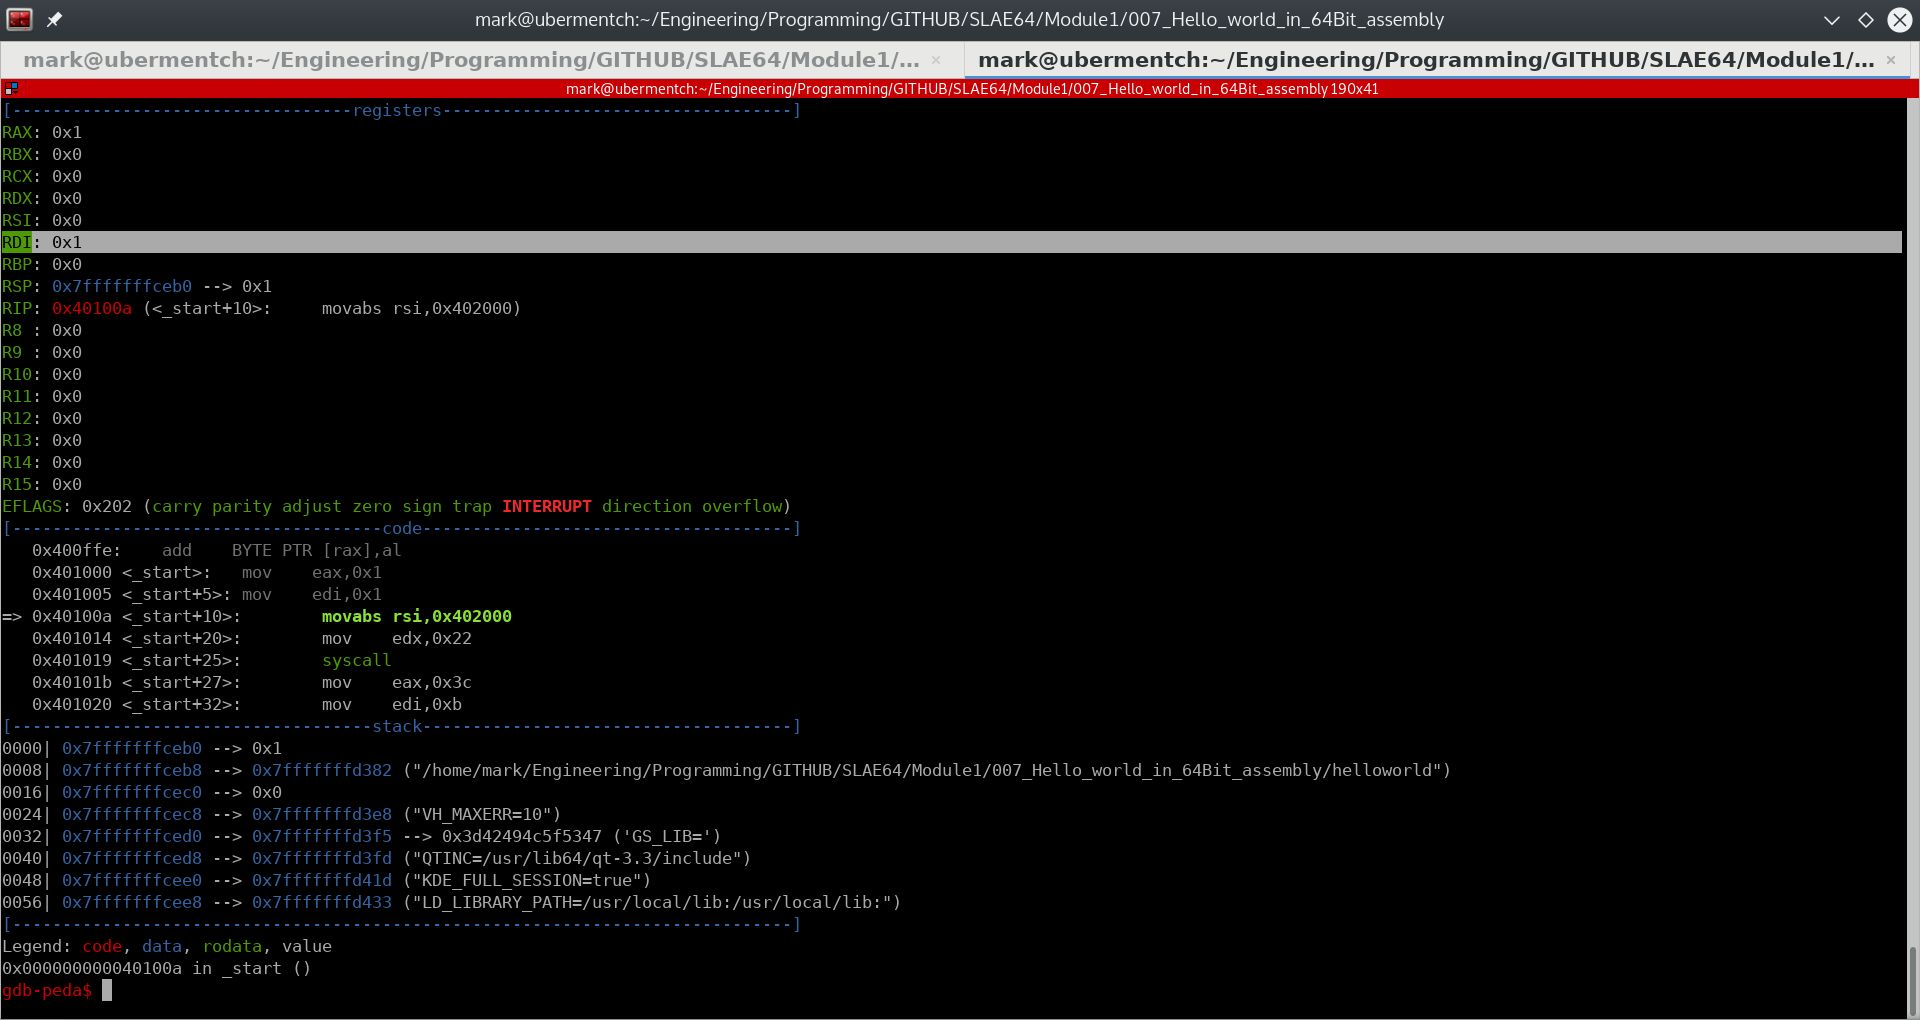
Fig. 65 After running step 0x401005 <_start+5>: mov edi,0x1#
The mov edi, 0x1 instruction simply moved the immediate value 1 into the 32-bit register edi, as can be seen in the screen shot above. The purpose of moving the 1 into edi is as a parameter to the WRITE system call. The 1 represents standard output, or STDOUT. This refers to the screen. Therefore, the WRITE system call will be writing to the screen, as opposed to writing to a network socket, or to a file on disk.
Executing step 0x40100a <_start+10>: movabs rsi,0x402000#
Prior to executing the instruction 0x40100a <_start+10>: movabs rsi,0x402000, the state of the registers and stack are as shown below:
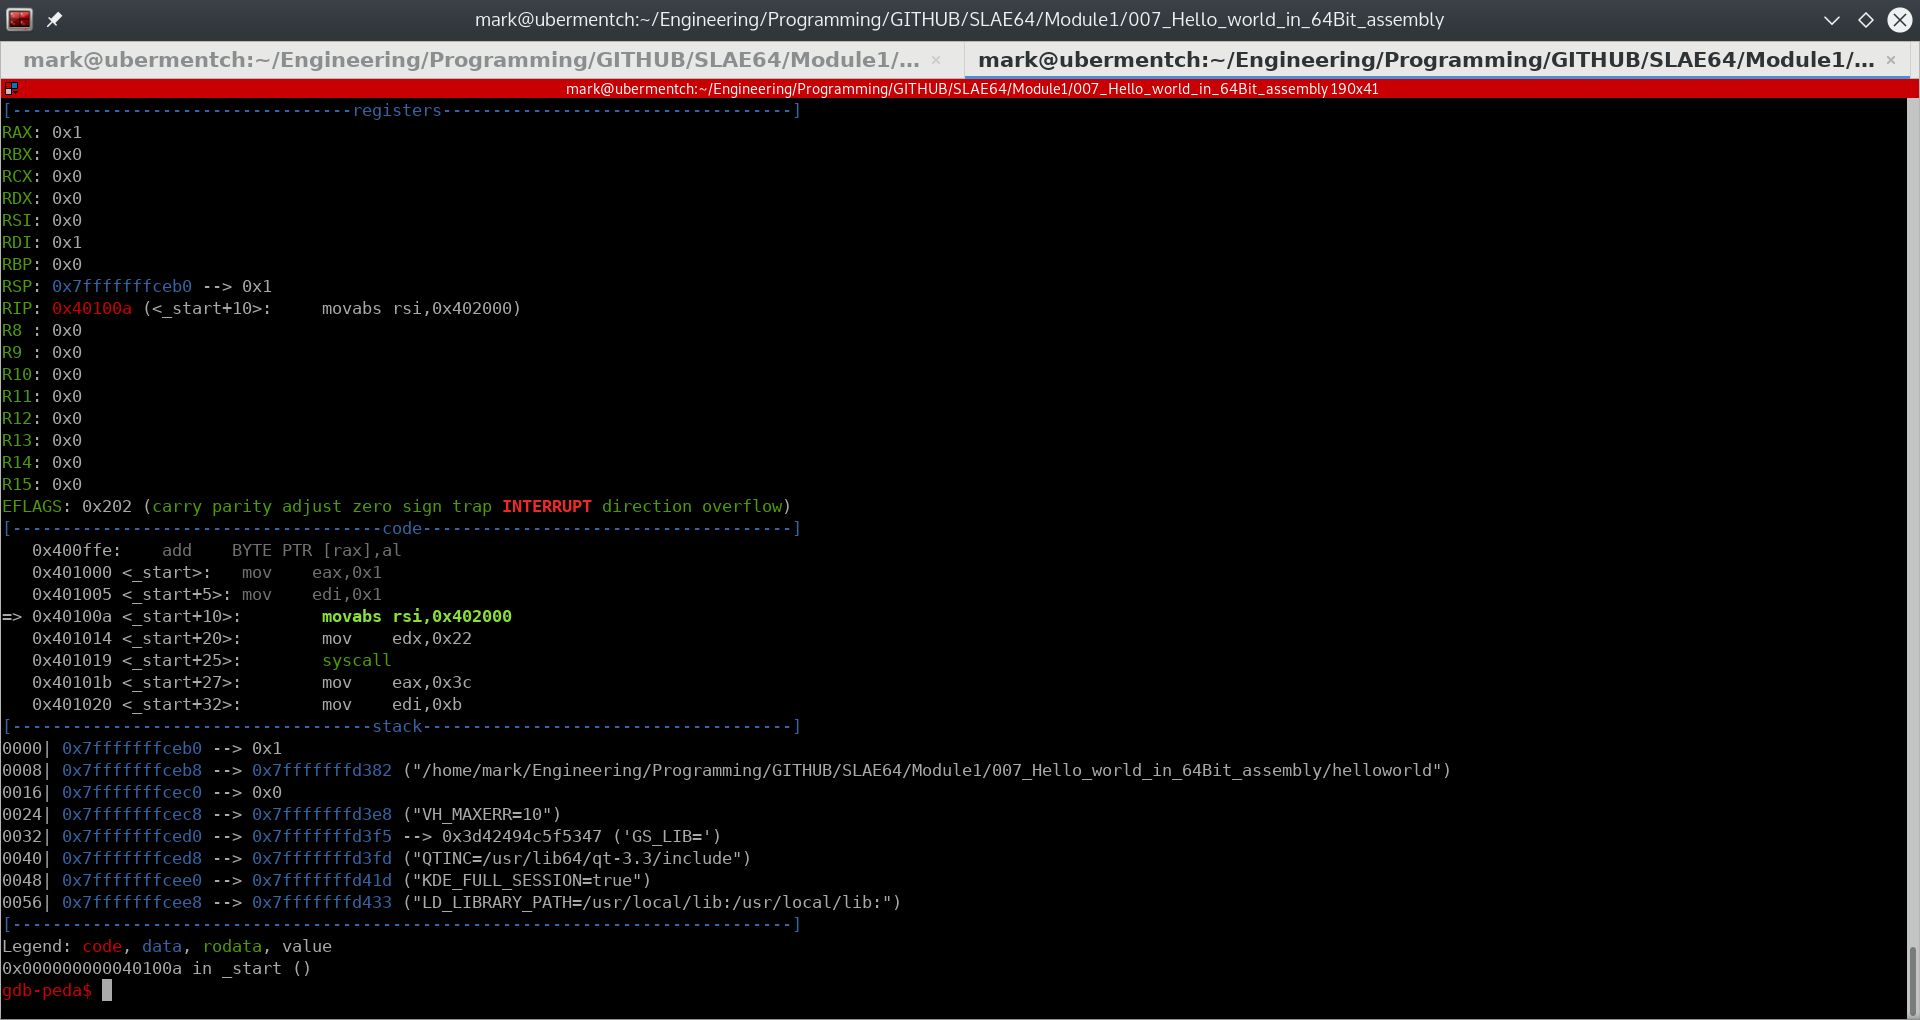
Fig. 66 Before running step 0x40100a <_start+10>: movabs rsi,0x402000#
The instruction 0x40100a <_start+10>: movabs rsi,0x402000 simply moves the immediate value 0x402000 into the 64-bit register rsi.
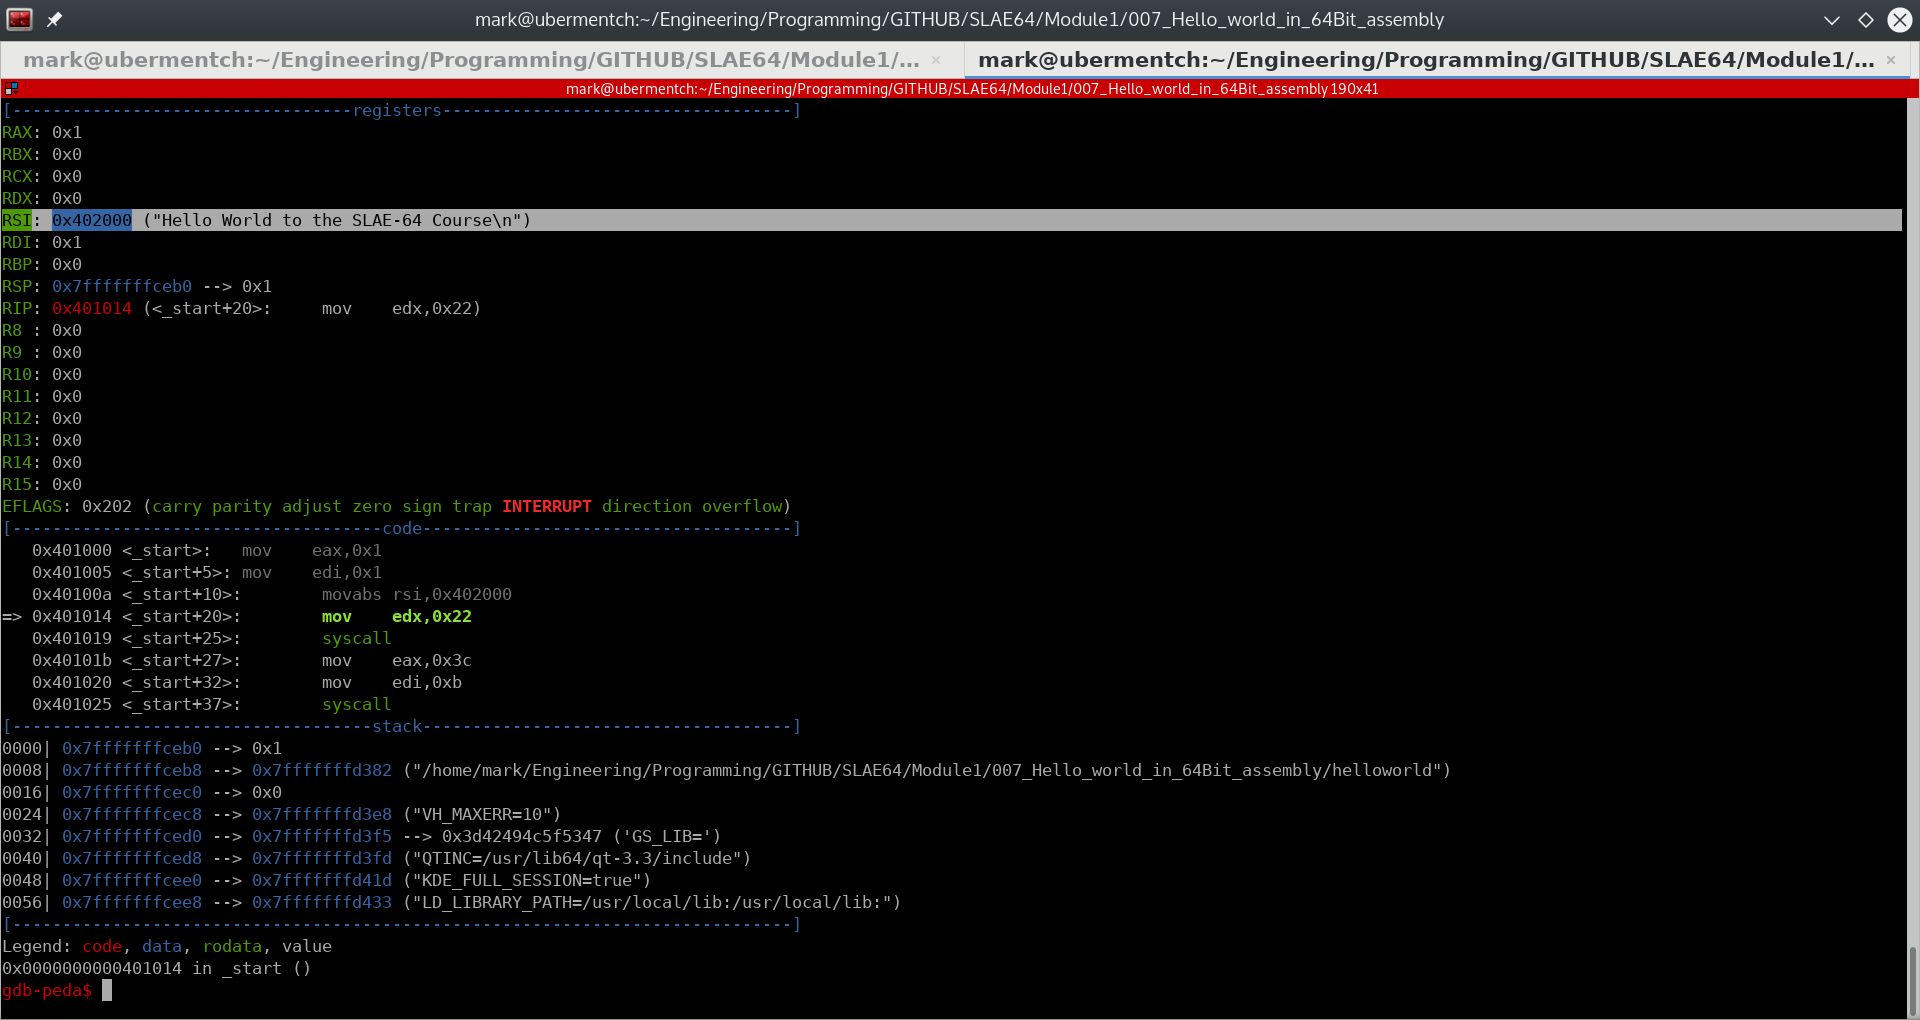
Fig. 67 After running step 0x40100a <_start+10>: movabs rsi,0x402000#
What is the significance of the value 0x402000? It is actually a memory address. We will examine the data at this memory address to see what it is, using the command:
gdb-peda$ x/s 0x402000
0x402000: "Hello World to the SLAE-64 Course\\n"
gdb-peda$
So basically the contents of the array of addresses starting at 0x402000 contains the string "Hello World to the SLAE-64 Course\\n". We can see this more clearly by issuing the command:
gdb-peda$ x/34xb 0x402000
0x402000:	0x48	0x65	0x6c	0x6c	0x6f	0x20	0x57	0x6f
0x402008:	0x72	0x6c	0x64	0x20	0x74	0x6f	0x20	0x74
0x402010:	0x68	0x65	0x20	0x53	0x4c	0x41	0x45	0x2d
0x402018:	0x36	0x34	0x20	0x43	0x6f	0x75	0x72	0x73
0x402020:	0x65	0x0a
gdb-peda$
These are nothing but the hexadecimal representations of the bytes that make up the letters of the string "Hello World to the SLAE-64 Course\\n". Notice the 0x0a at the end, which is the newline character. This is another bit of setup before the WRITE system call is invoked. The WRITE system call will output the string located at 0x402000 to the screen.
Executing step 0x401014 <_start+20> mov edx, 0x22#
Prior to executing the instruction 0x401014 <_start+20> mov edx, 0x22, the state of the registers and stack are as shown below:
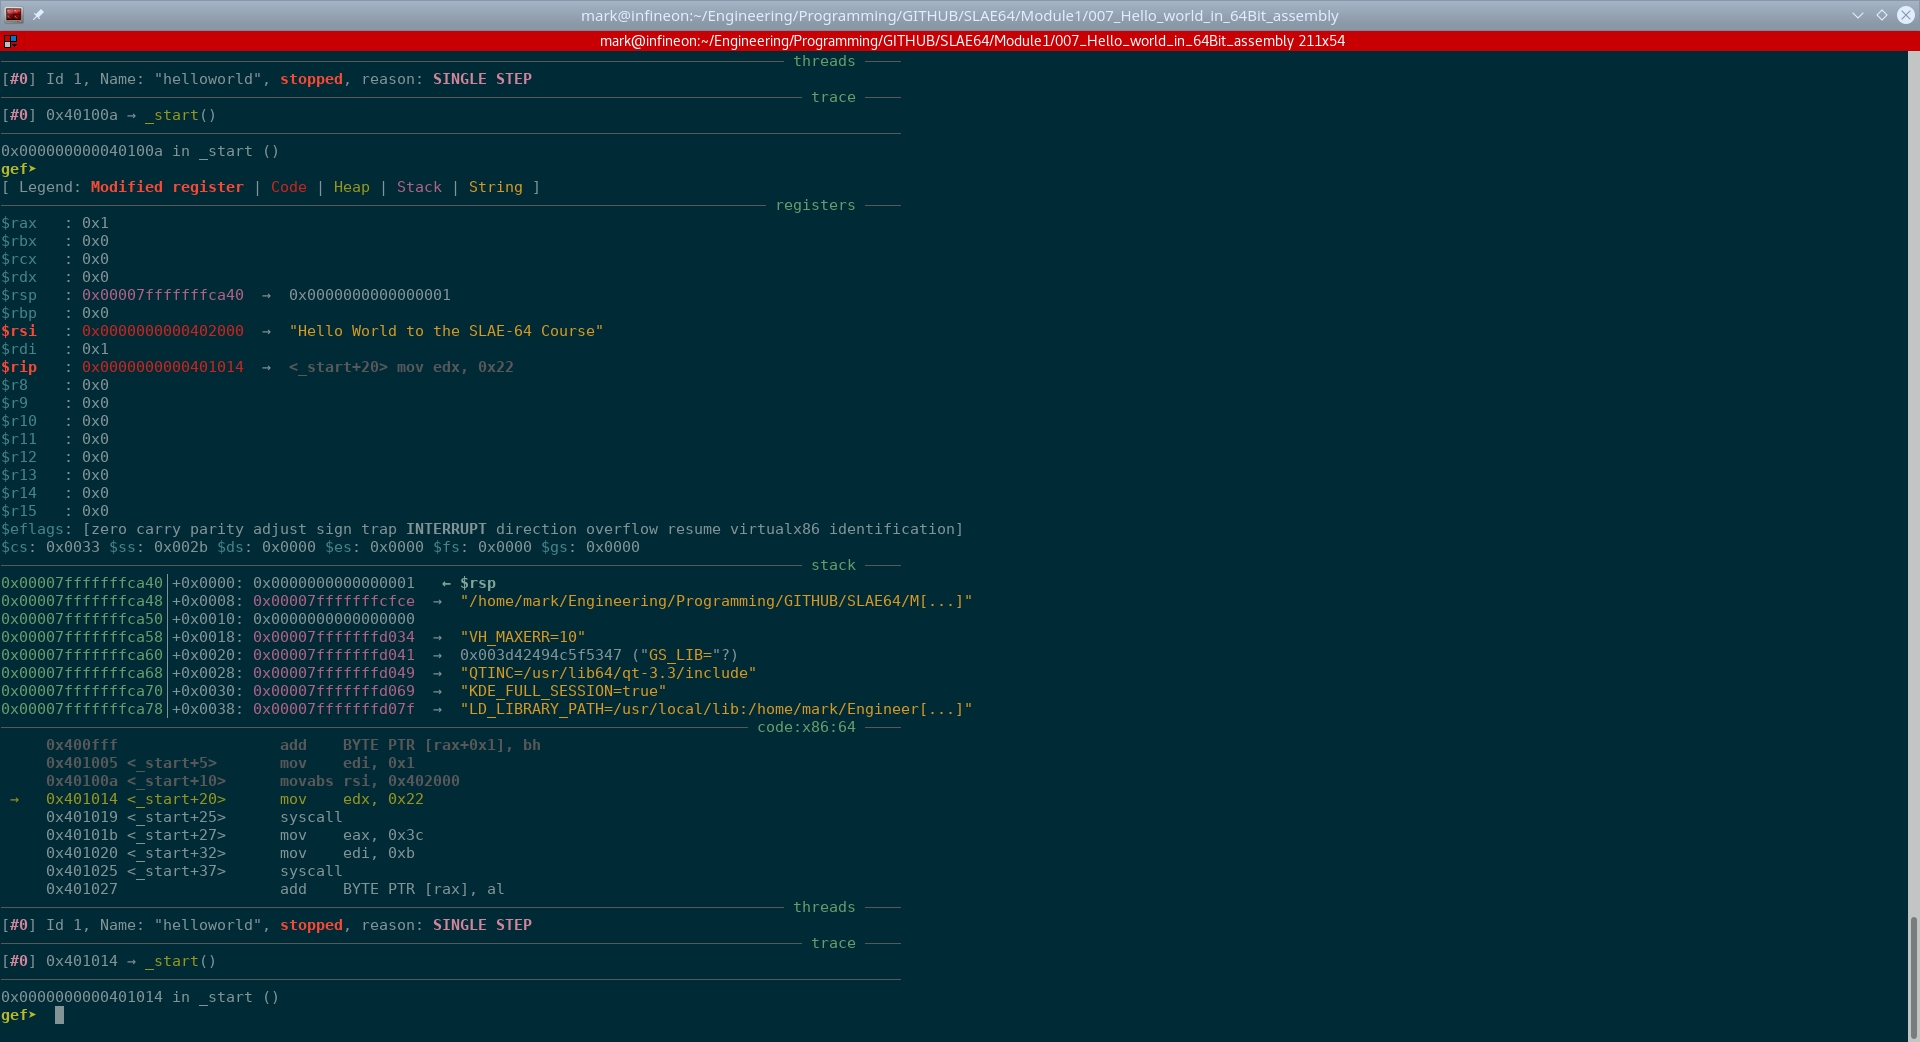
Fig. 68 Before running step 0x401014 <_start+20> mov edx, 0x22#
The instruction 0x401014 <_start+20> mov edx, 0x22 simply moves the immediate value 0x22 into the 32-bit register edx.

Fig. 69 After running step 0x401014 <_start+20> mov edx, 0x22#
The instruction 0x401014 <_start+20> mov edx, 0x22 moved the immediate value 0x22 into the 32-bit register edx. The hex value 0x22 is 34 in decimal. We will confirm this by using IPython for conversion and to get comfortable with incorporating more Python use for computing activities.
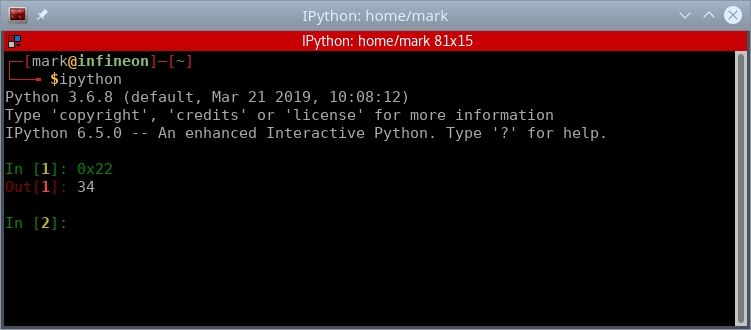
Fig. 70 Using IPython to convert hex 0x22 into decimal#
0x22 hex or 34 decimal is the length of the string "Hello World to the SLAE-64 Course\\n", including the newline character \\n. This was actually computed by the assembler and placed into the hardcoded opcodes. If you recall, the original assembly code was:
global _start

section .text

_start:

 	; print on screen
 	mov rax, 1
 	mov rdi, 1
 	mov rsi, hello_world
 	mov rdx, length
 	syscall

 	; exit gracefully
 	mov rax, 60
 	mov rdi, 11
 	syscall

section .data
 	hello_world: db 'Hello World to the SLAE-64 Course',0x0a
 	length: equ $-hello_world
There was actually a trick used to obviate the need to manually count the number of characters in the string "Hello World to the SLAE-64 Course". This trick was to create a constant called length, and to equate it to the memory location just after the string "Hello World to the SLAE-64 Course", subtracted from its memory location. This memory location math gives exactly the length of the string "Hello World to the SLAE-64 Course". The way to obtain the memory location of the constant is to use the $ directive in the assembly code, as can be seen from the code snippet:
length: equ $-hello_world
This is the last bit of setup needed before invoking the WRITE system call. The instruction 0x401014 <_start+20> mov edx, 0x22, will let the WRITE system call know that the length of the string to output to the screen is 0x22 hex bytes long. We are now ready to invoke the system call. This will occur in the next instruction as shown in the next section.
Executing the instruction 0x401019 <_start+25>: syscall#
Prior to executing the instruction 0x401019 <_start+25>: syscall, the state of the registers and stack are as shown below:
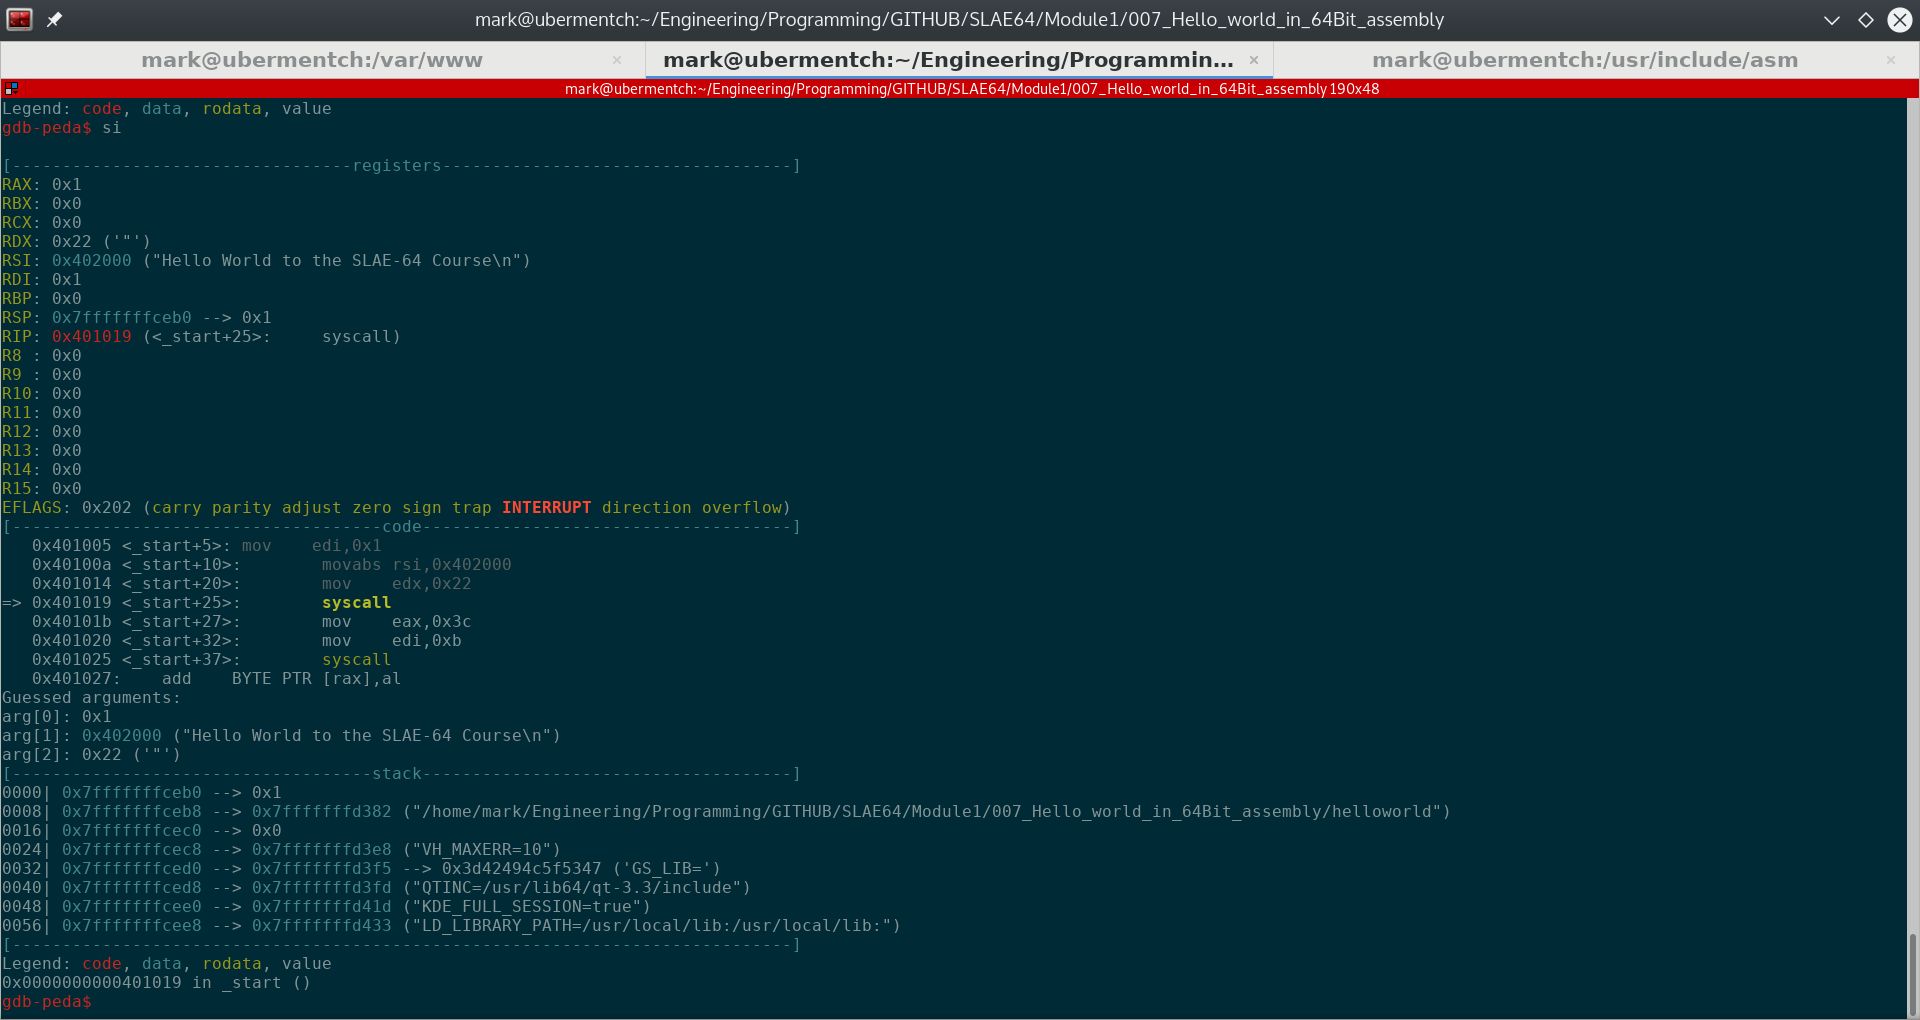
Fig. 71 Before running step 0x401019 <_start+25>: syscall#
The syscall instruction invokes the Linux kernel to execute a system call. In this case, we are invoking the WRITE system call, which will print the string "Hello World to the SLAE-64 Course" to the screen. The results of this call are shown below.
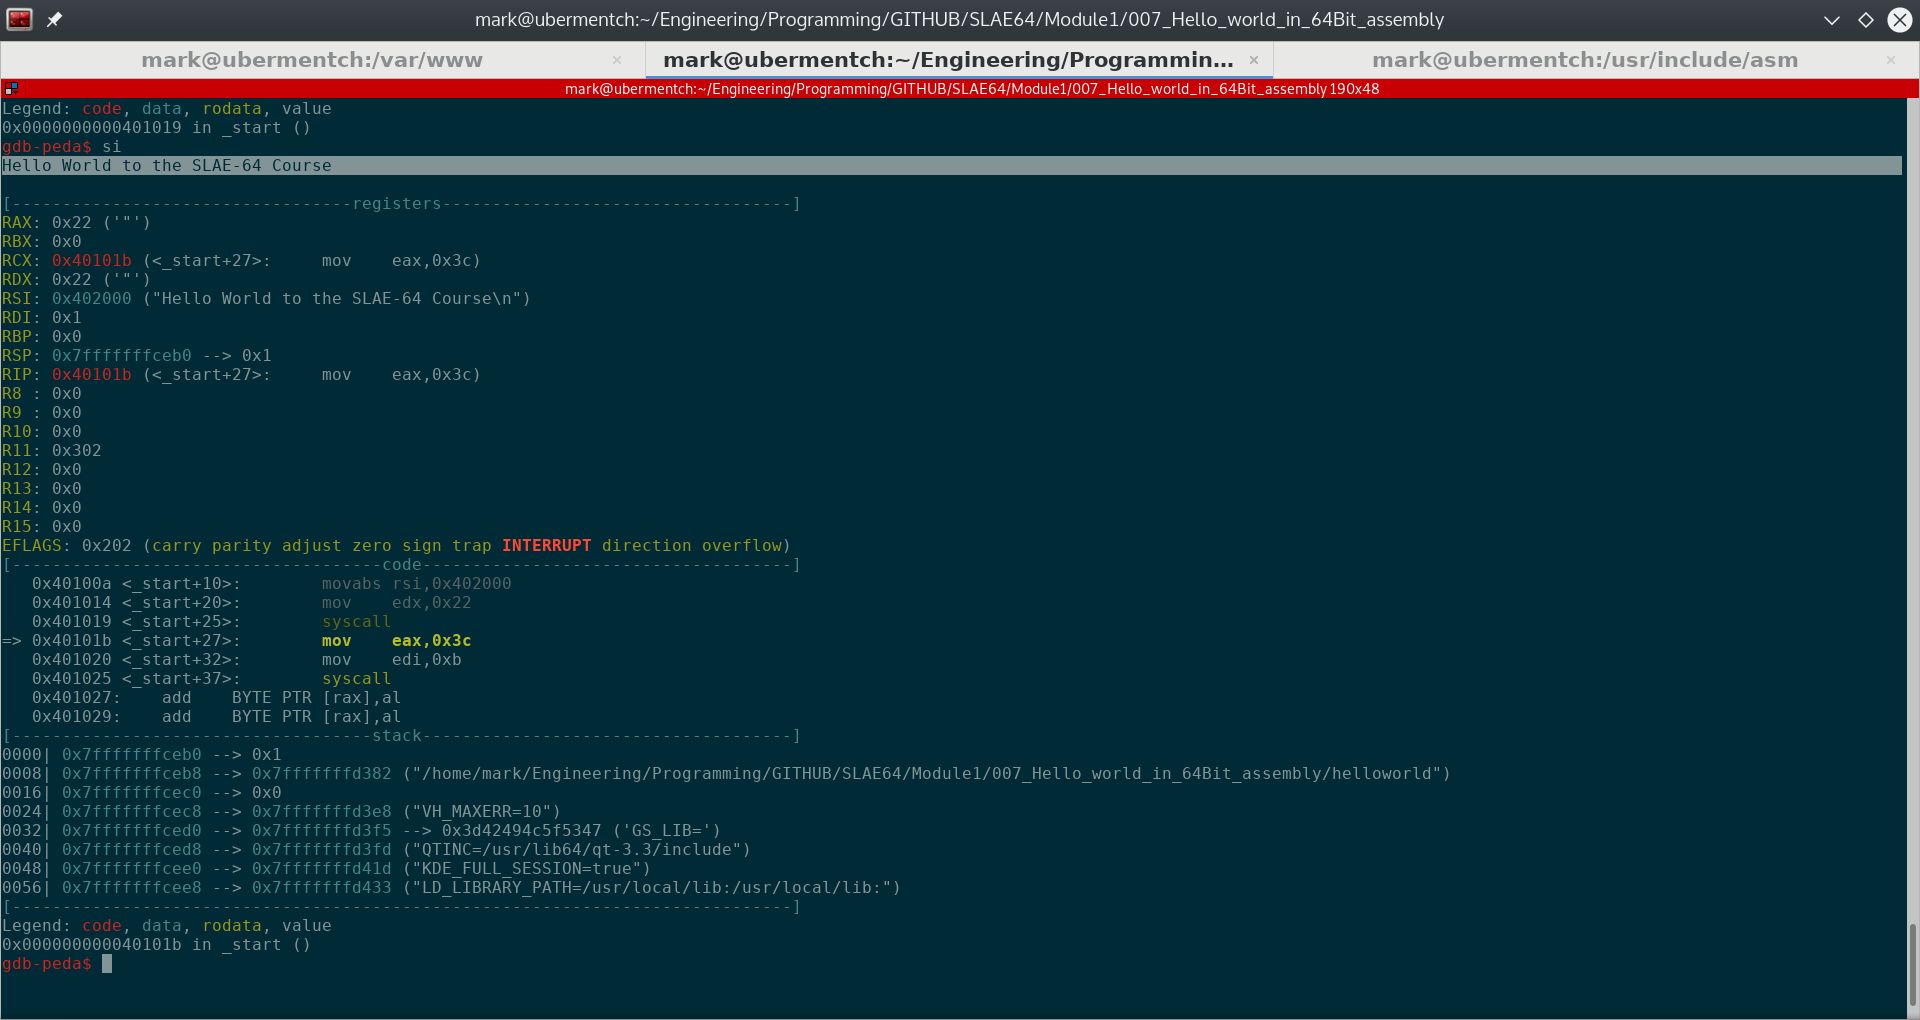
Fig. 72 After running step 0x401019 <_start+25>: syscall#
It can be seen from the above screenshot that the WRITE system call was invoked properly as the string "Hello World to the SLAE-64 Course" was printed to the screen, and execution of the program is continuing normally. The next step is to invoke the EXIT system call. It is important to properly exit a program as the program counter may be pointing to an invalid instruction after the WRITE system call instructions. In this case the program will crash. Exiting properly will virtually guarantee that the program will exit gracefully back to the shell. We will look at exiting gracefully in the next section.
Executing the instruction 0x40101b _start+27>: mov eax,0x3c#
As stated in the previous section, we must now have the program exit gracefully. In order to do this, we setup an invocation to the EXIT system call. This is done by loading eax with the system call number for the EXIT system call. In this case, it is 0x3c hex, or 60 in decimal. To find the correct system call number, we again look at the /usr/include/asm/unistd_64 and search for the EXIT system call.
#define __NR_alarm 37
#define __NR_setitimer 38
#define __NR_getpid 39
#define __NR_sendfile 40
#define __NR_socket 41
#define __NR_connect 42
#define __NR_accept 43
#define __NR_sendto 44
#define __NR_recvfrom 45
#define __NR_sendmsg 46
#define __NR_recvmsg 47
#define __NR_shutdown 48
#define __NR_bind 49
#define __NR_listen 50
#define __NR_getsockname 51
#define __NR_getpeername 52
#define __NR_socketpair 53
#define __NR_setsockopt 54
#define __NR_getsockopt 55
#define __NR_clone 56
#define __NR_fork 57
#define __NR_vfork 58
#define __NR_execve 59
#define __NR_exit 60
#define __NR_wait4 61
#define __NR_kill 62
#define __NR_uname 63
#define __NR_semget 64
#define __NR_semop 65
#define __NR_semctl 66
#define __NR_shmdt 67
#define __NR_msgget 68
#define __NR_msgsnd 69
#define __NR_msgrcv 70
#define __NR_msgctl 71
#define __NR_fcntl 72
#define __NR_flock 73
#define __NR_fsync 74
#define __NR_fdatasync 75
#define __NR_truncate 76
From the above listing of the /usr/include/asm/unistd_64 file, we can see that indeed the EXIT system call number is 60, and this is the reason to load 60, or 0x3c hex into the register eax.
Prior to executing the instruction 0x40101b <_start+27>: mov eax,0x3c, the state of the stack and registers are as shown in the following screenshot.
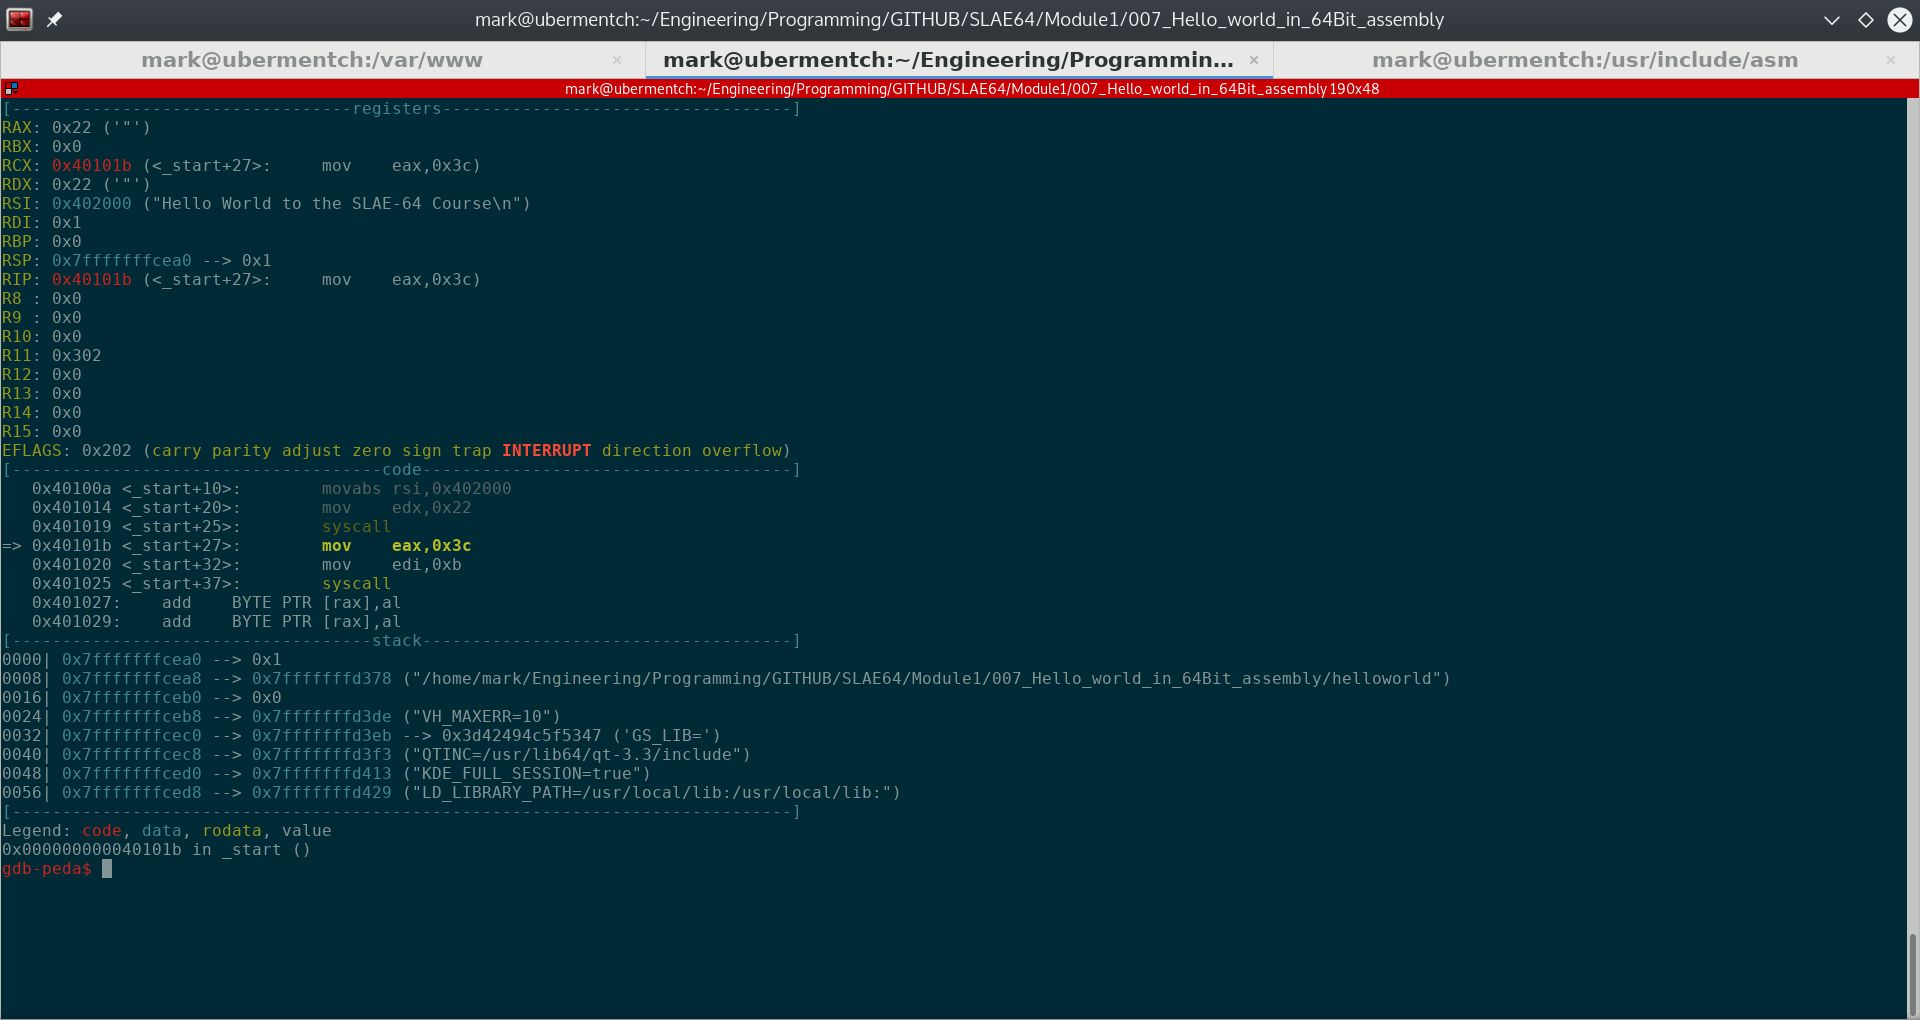
Fig. 73 Before running step 0x40101b <_start+27>: mov eax,0x3c#
The instruction 0x40101b <_start+27>: mov eax,0x3c simply moves the immediate value 0x3c hex or 60 decimal into the 32-bit register eax.
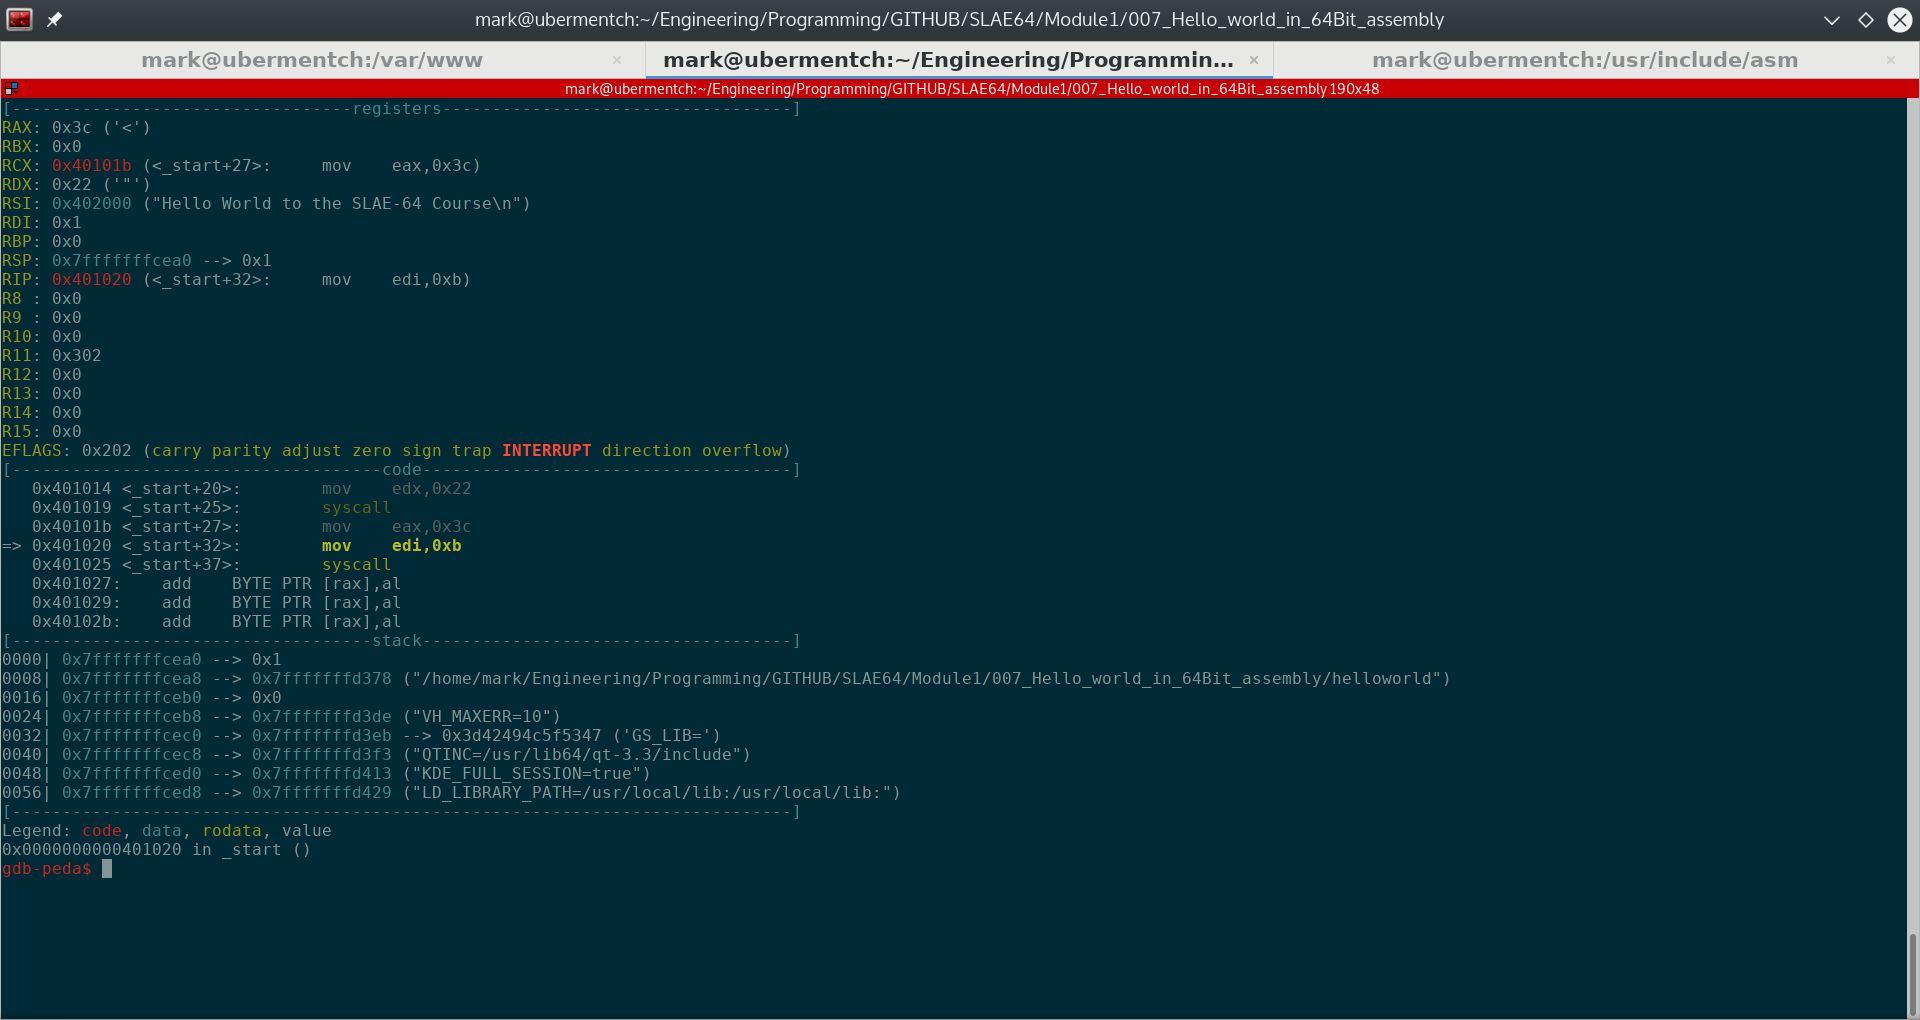
Fig. 74 After running step 0x40101b <_start+27>: mov eax,0x3c#
It can be seen from the above screenshot that the the 0x3c hex or 60 decimal was loaded into eax. This is the first part of setting up the EXIT system call. The last part is to tell the EXIT system call which return value to give back to the shell. It is really an exit status, and is arbitrary. Usually, when there are no errors, a zero is returned back to the shell. In our case, we wish to return 0xb hex or 11 decimal as a learning tool. We can then check the return exit status with an appropriate command.
Executing the instruction 0x401020 <_start+32>: mov edi,0xb#
Prior to executing the instruction 0x401020 <_start+32>: mov edi,0xb, the state of the stack and registers are as shown in the following screenshot.
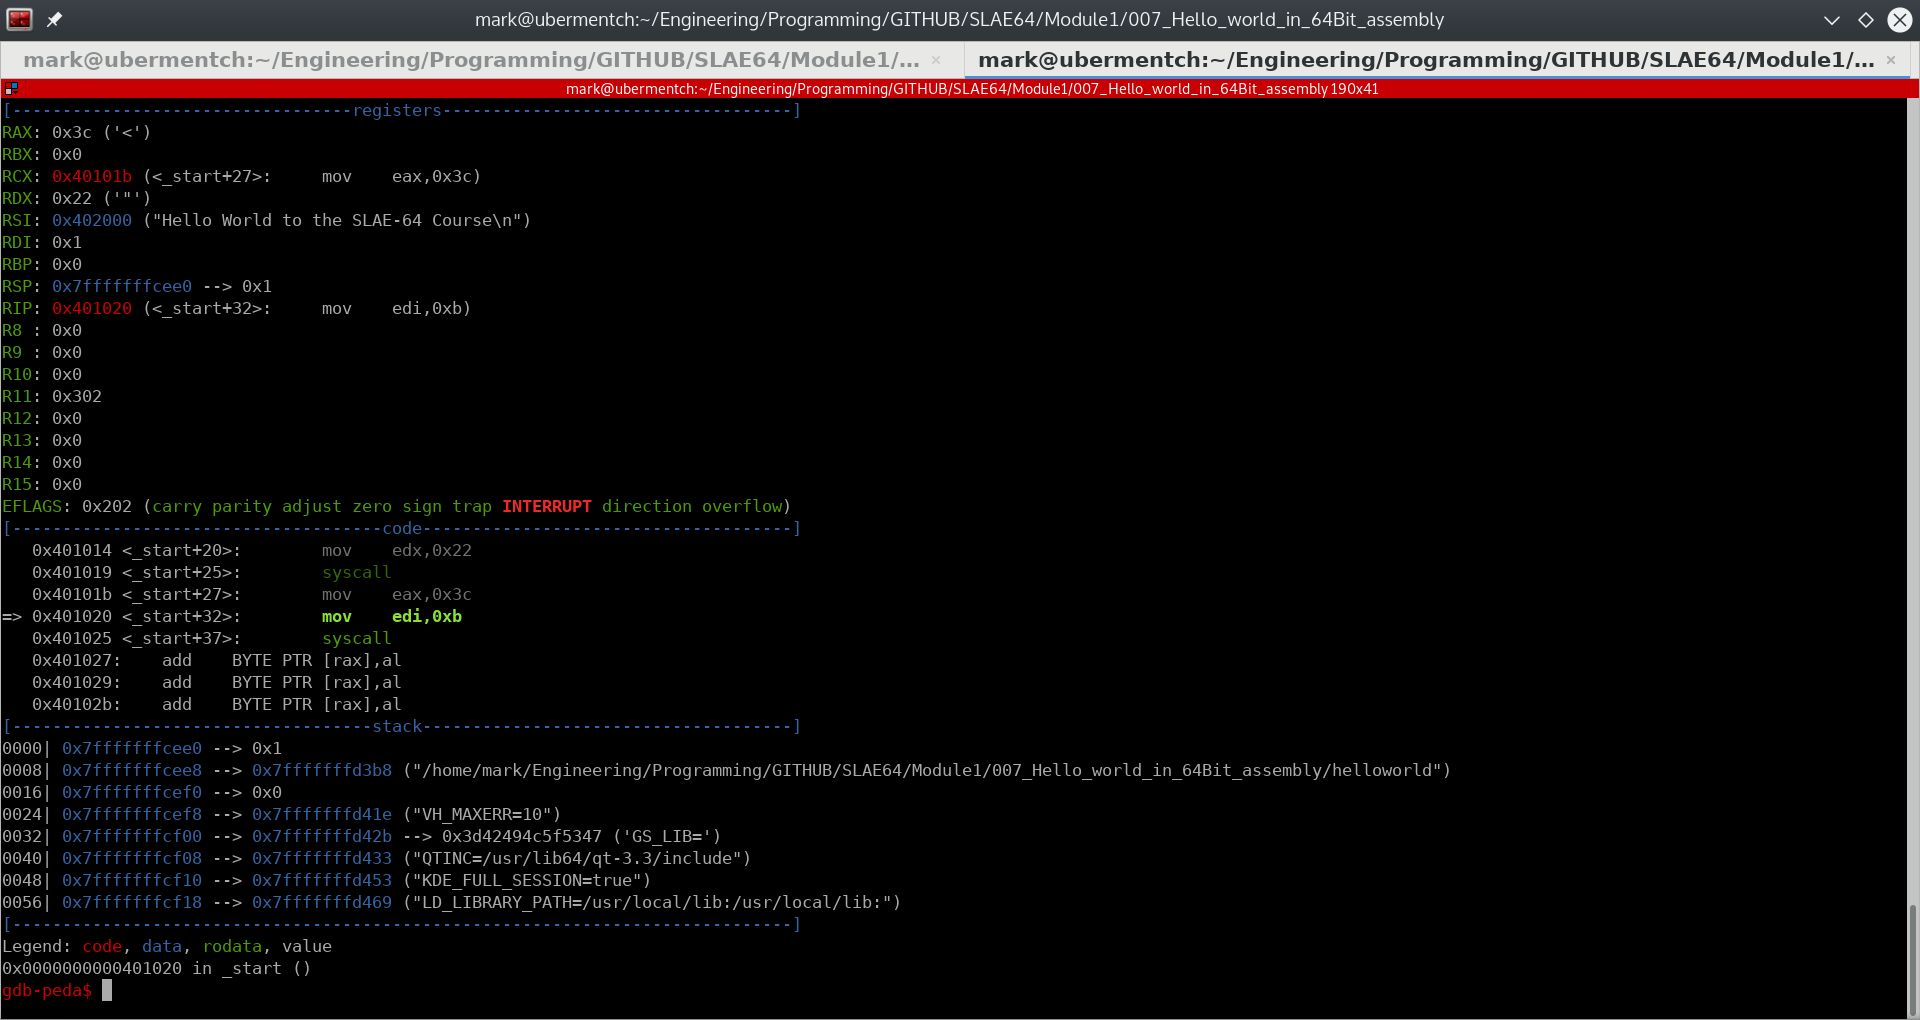
Fig. 75 Before running step 0x401020 <_start+32>: mov edi,0xb#
The instruction:
0x401020 <_start+32>: mov edi,0xb
simply moves the immediate value 0xb hex or 11 decimal into the 32-bit register edi. This value is the return value of our executable to the calling shell.
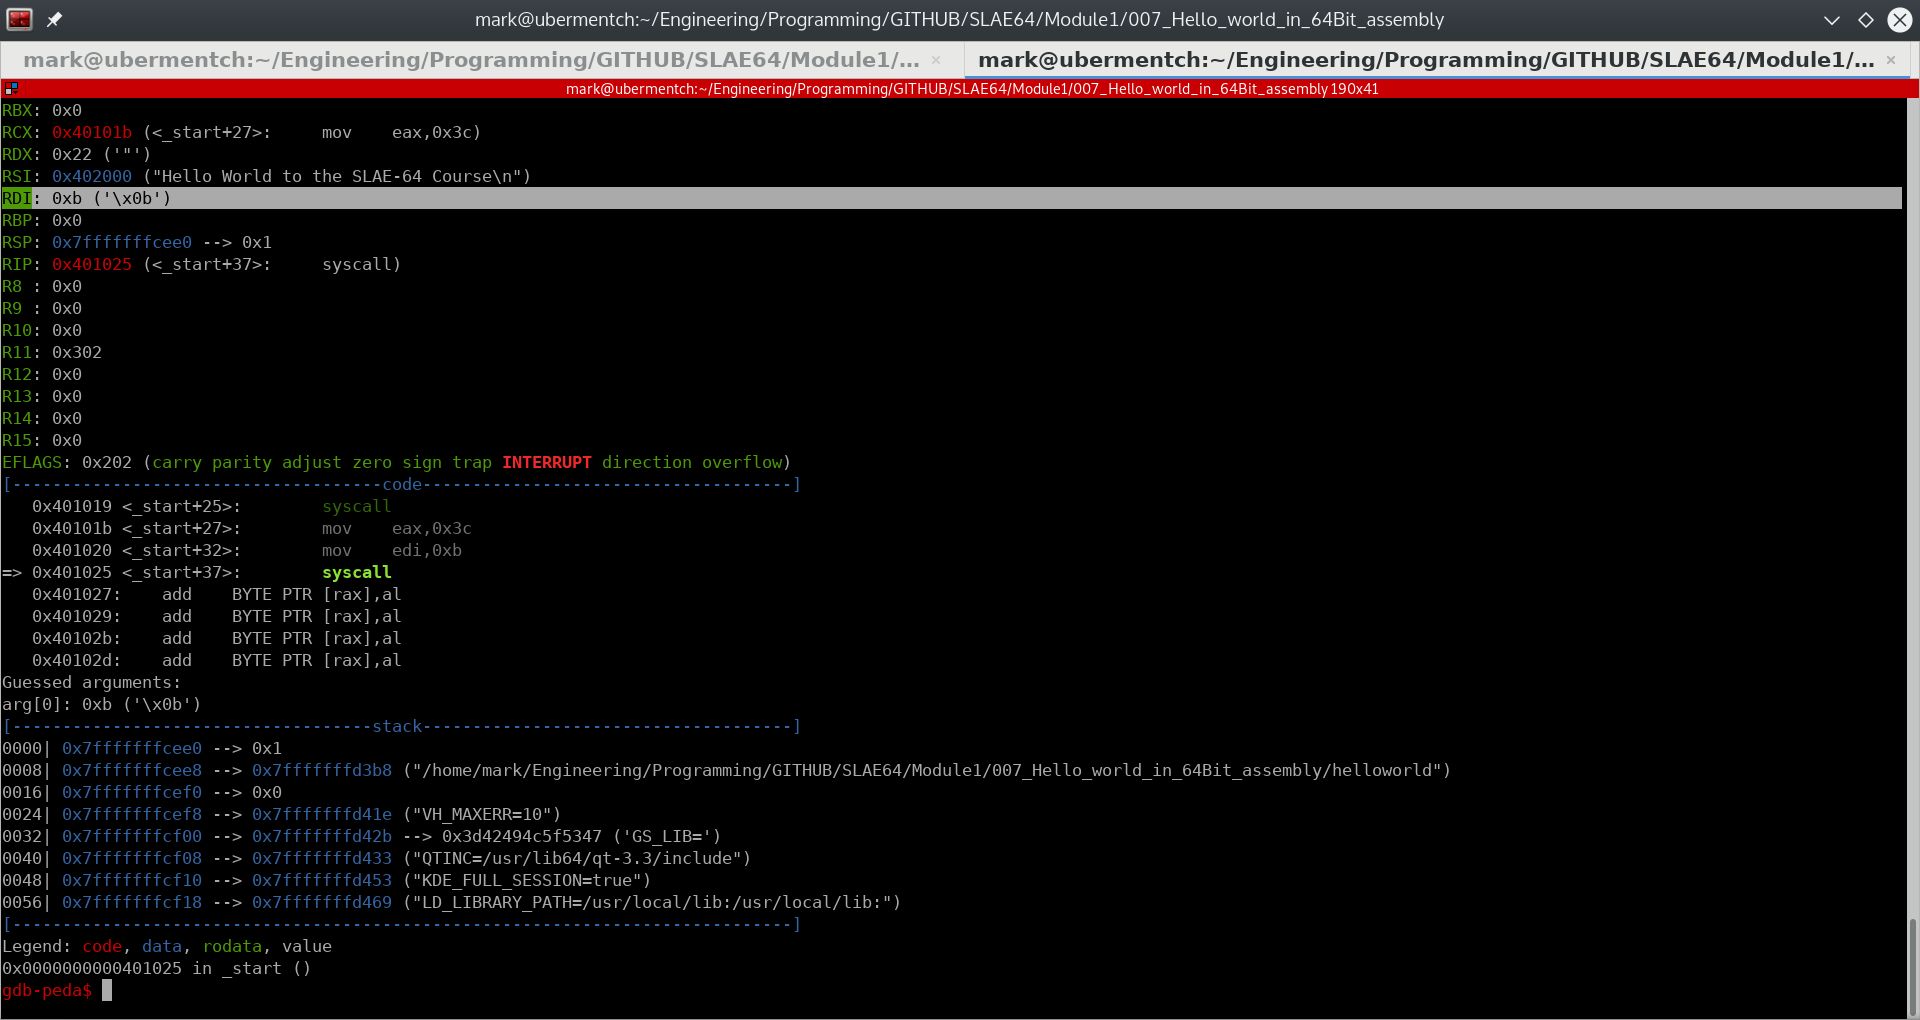
Fig. 76 After running step 0x401020 <_start+32>: mov edi,0xb#
After executing the instruction:
0x401020 <_start+32>: mov edi,0xb
0xb hex or 11 decimal was loaded into the 32-bit register edi. We are now ready to call the kernal to invoke the EXIT system call. This is shown in the next section.
Executing the instruction 0x401025 <_start+37>: syscall#
Prior to executing the instruction 0x401025 <_start+37>: syscall, the state of the stack and registers are as shown in the following screenshot.
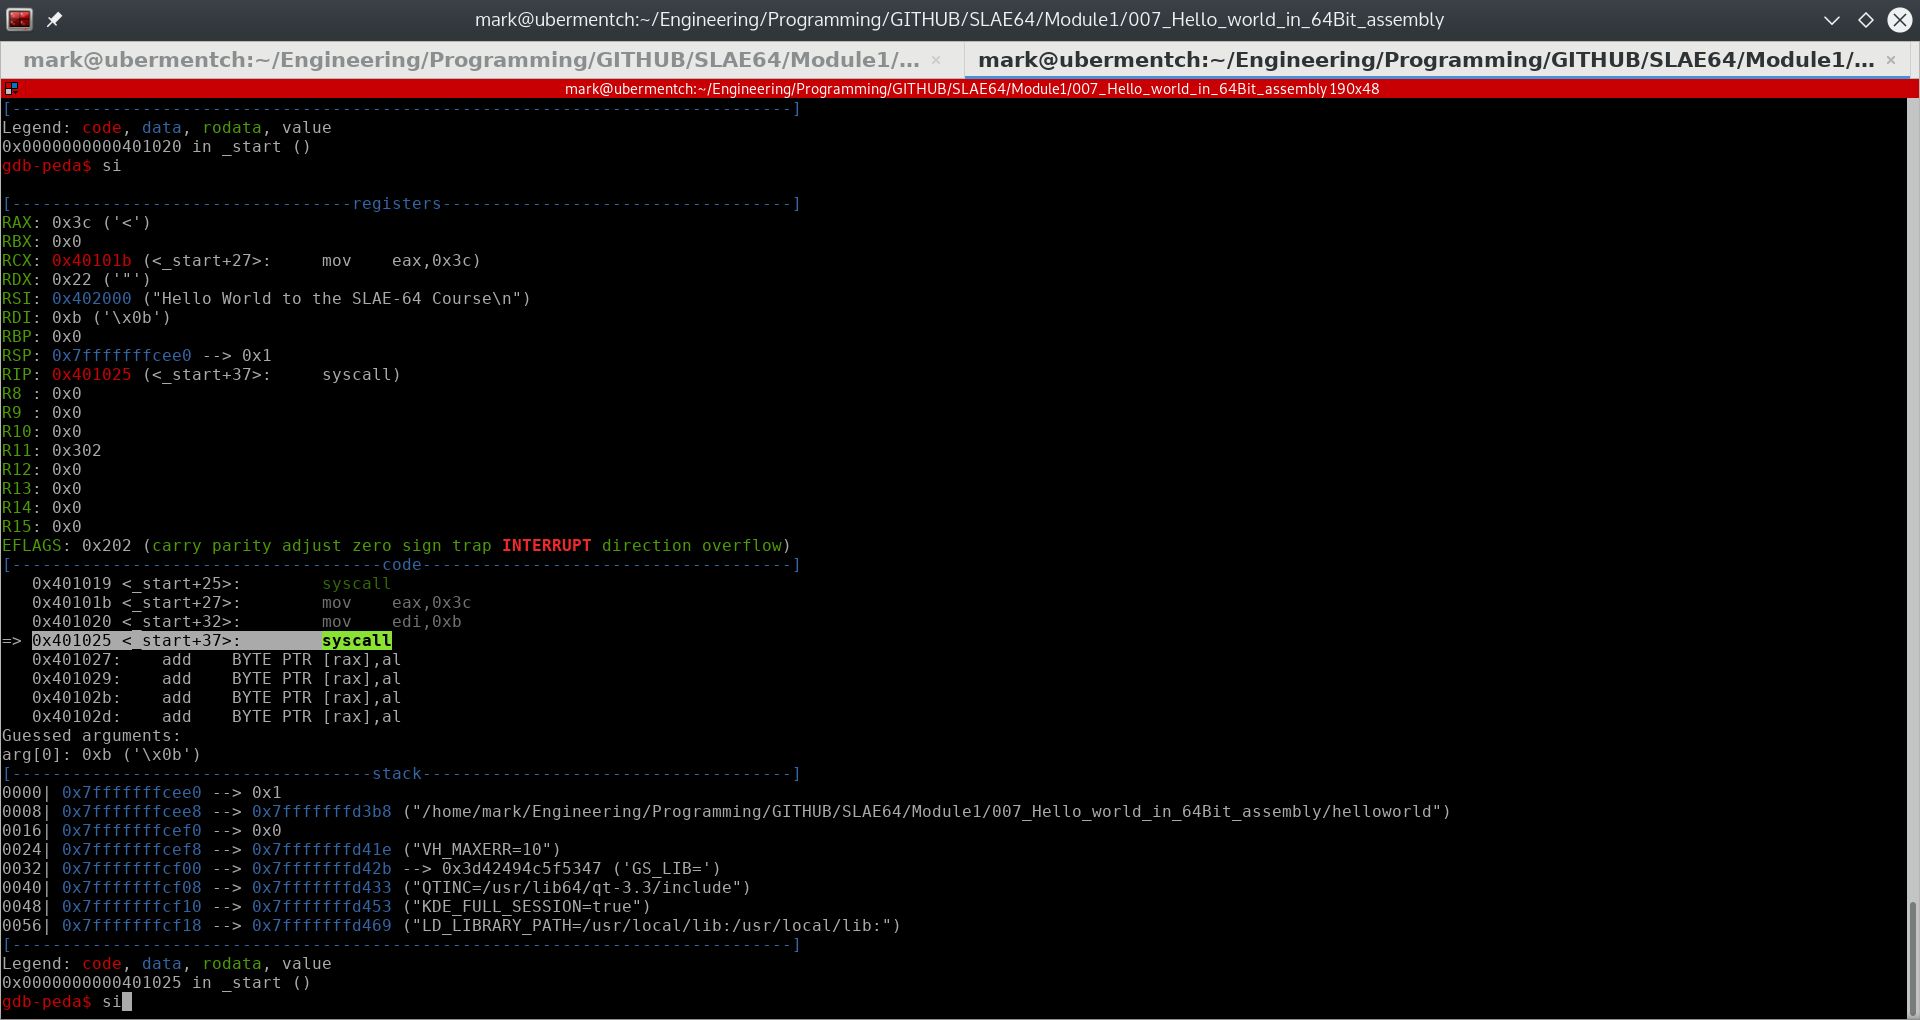
Fig. 77 Before running step 0x401025 <_start+37>: syscall#
After executing the instruction 0x401025 <_start+37>: syscall, the process is terminated and the exit status is returned to the shell. The exit status is 0xb hex or 11 decimal. This is shown in the following screenshot.
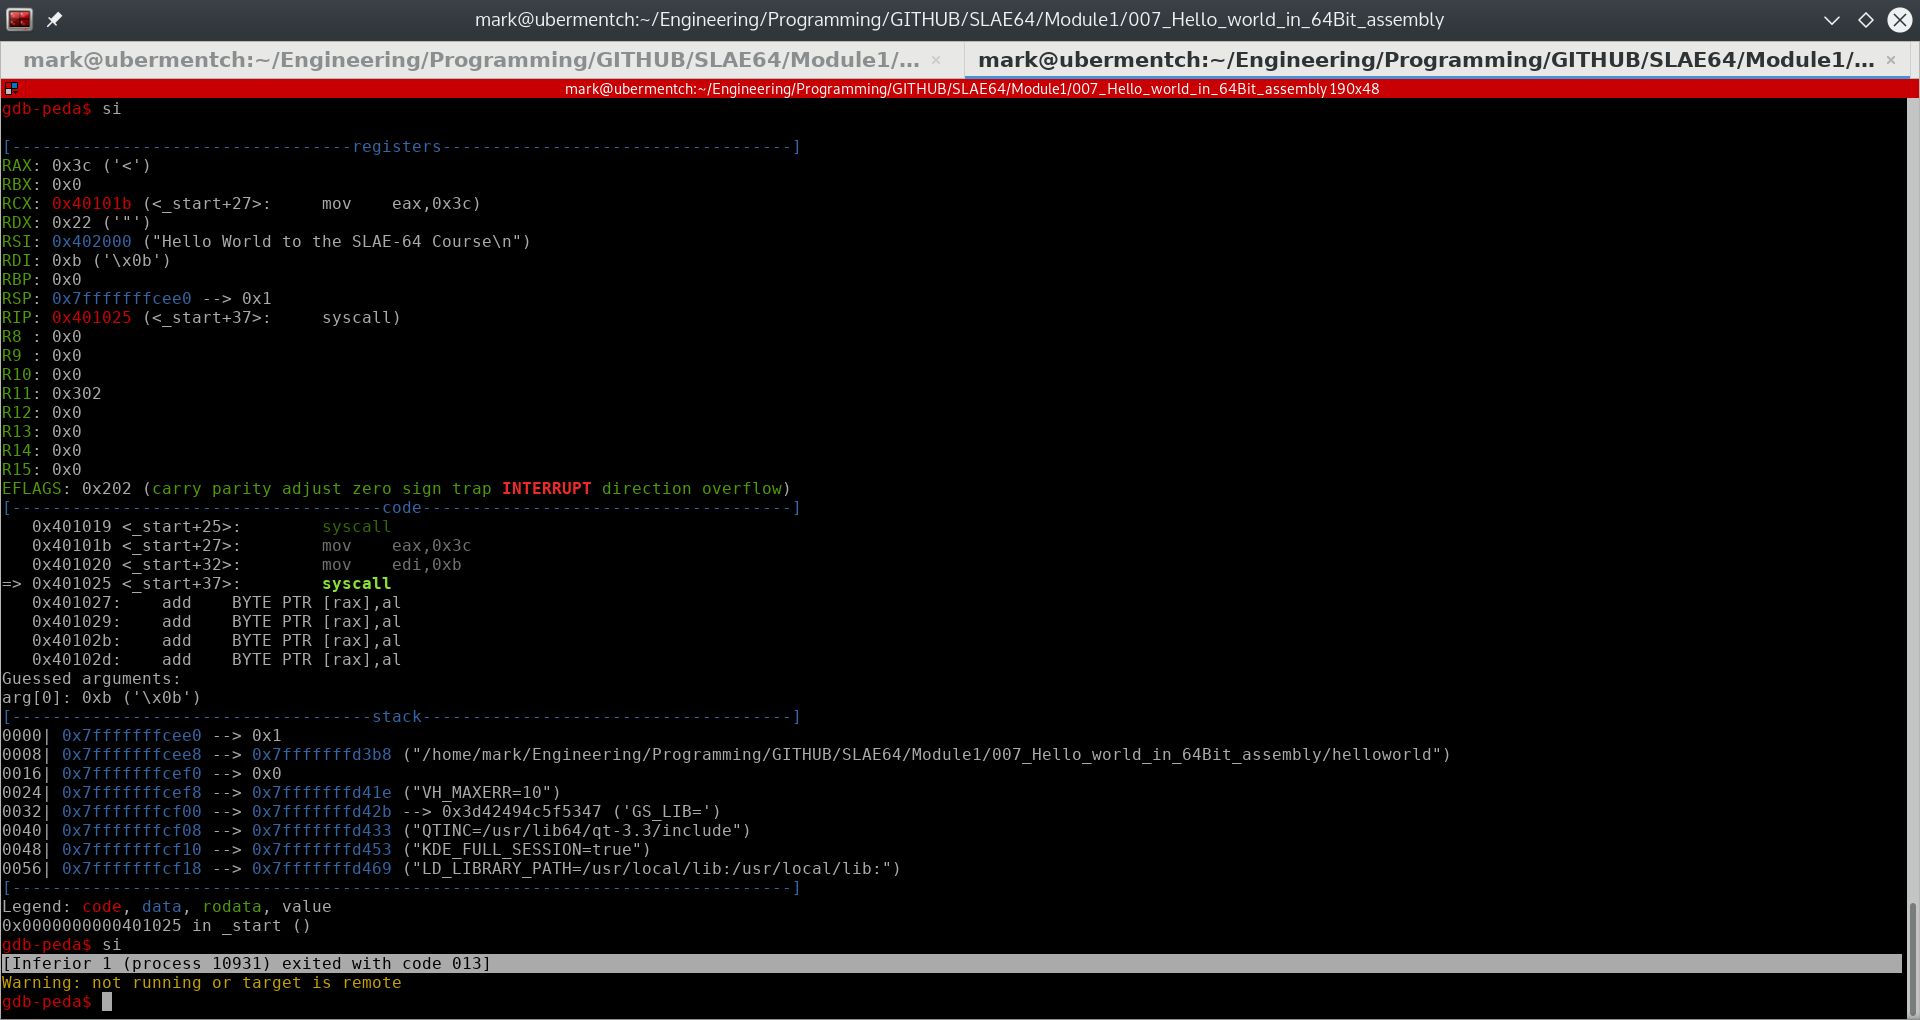
Fig. 78 After running step 0x401025 <_start+37>: syscall#
We can see from the above screenshot that the process terminated with an exit code of 013. Why is it not 0xb hex or 11 decimal? Because apparently, GDB displays the exit code in octal. As before, we will use Python to convert 013 octal into decimal. This is shown in the following screenshot:
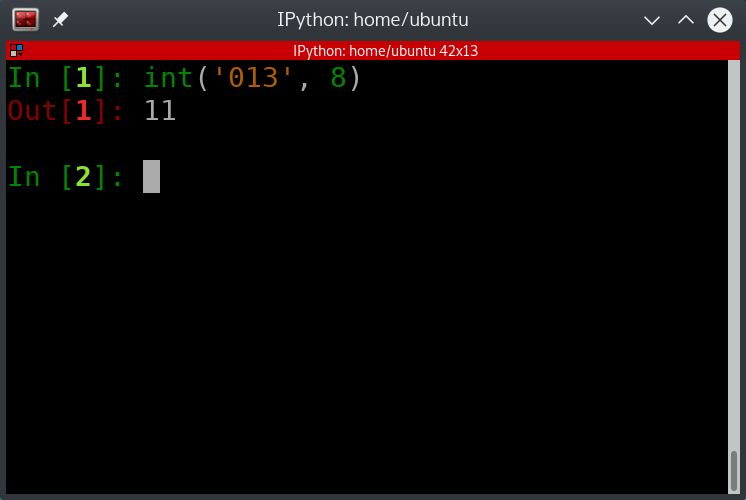
Fig. 79 Using Python to convert 013 octal to decimal#
We can also verify the exit status of the process by using the command:
echo $?
This can be seen from the following screenshot:
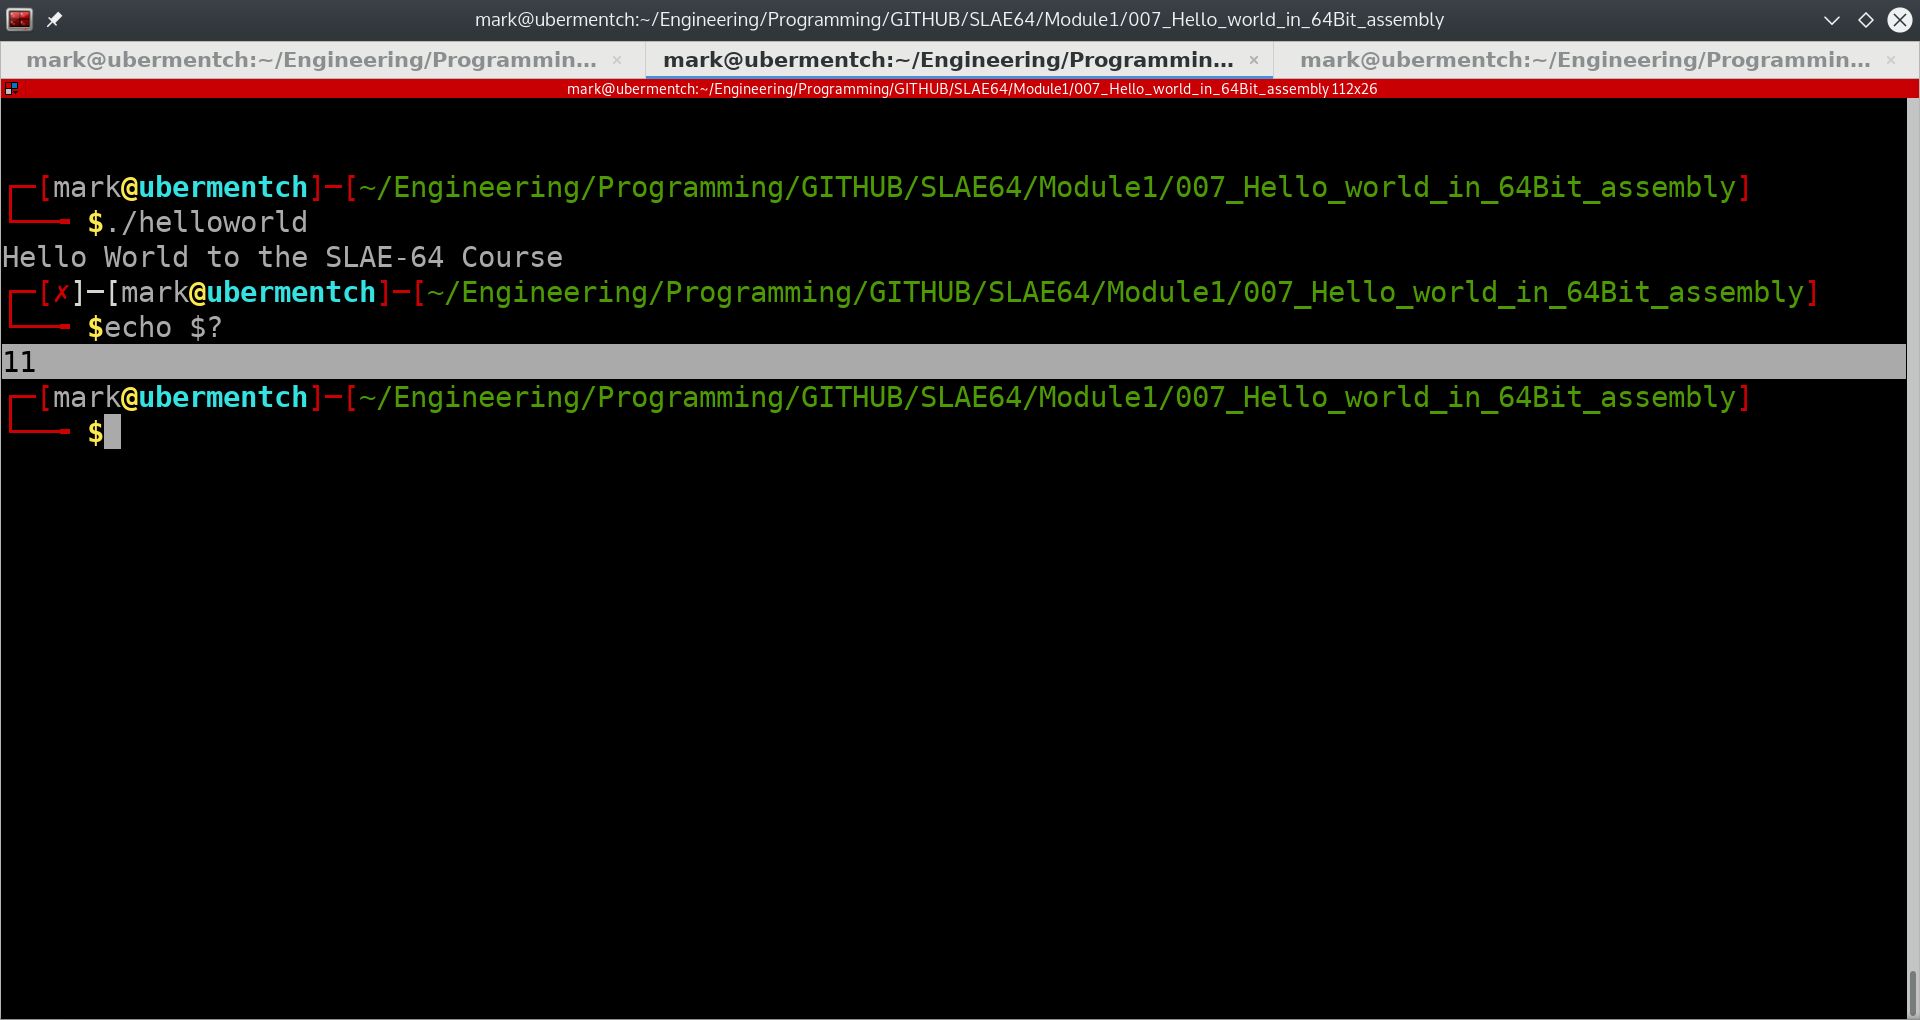
Fig. 80 Using the Linux command line to obtain the exit status of a process#
We can see from the above screenshot that the exit status of the terminated process is indeed 11.
Conclusions on examining helloworld in GDB.#
In this section we looked at examining the execution of a simple 64 bit binary in GDB. We looked at how system calls are setup and how they are invoked. We also looked at how to obtain the exit status of a terminated process. In the next section, we will examine why the helloworld executable is not suitable for being used as shellcode. The reasons are that:
The object code for the executable contains many nulls. This is evident by examining the object file’s dump:
$objdump -d helloworld.o
helloworld.o:     file format elf64-x86-64


Disassembly of section .text:

0000000000000000 <_start>:
0:	48 b8 01 00 00 00 00 	movabs $0x1,%rax
7:	00 00 00
a:	48 bf 01 00 00 00 00 	movabs $0x1,%rdi
11:	00 00 00
14:	48 be 00 00 00 00 00 	movabs $0x0,%rsi
1b:	00 00 00
1e:	48 ba 22 00 00 00 00 	movabs $0x22,%rdx
25:	00 00 00
28:	0f 05                	syscall
2a:	48 b8 3c 00 00 00 00 	movabs $0x3c,%rax
31:	00 00 00
34:	48 bf 0b 00 00 00 00 	movabs $0xb,%rdi
3b:	00 00 00
3e:	0f 05                	syscall

$
We can see from the objdump above that the code indeed includes many nulls. These nulls make the code above unsuitable for shellcode.
The code makes use of the full 64-bit registers, which can hold very large numbers; however, the immediate numbers that we have used are relatively very small, less than then integer 100. This is an inefficient use of resources. In shellcoding, we want to make the shellcode as efficient and compact as possible.
In the next section, we will look at how to remove these nulls and optimize the code so that it can be suitable to be used as shellcode.