
Lesson 3 - GDB Test#
Cracking a Password Checking Program with GDB
Introduction#
In this section, we will be following along with and completing course material from the Pentester Academy’s SecurityTube Linux Assembly Language Expert 64-Bit course. The first assignment is called gdbtest. The goal is to use GDB to modify the contents of the CPU registers so that the password checking program will allow the student to view the message:
“Welcome to the SLAE 64-bit course! Please proceed to the next video!”
Otherwise, the program will display:
“It’s time to review those GDB videos again!”
Project code is contained in my GitHub repository.
The program gdb_test.c#
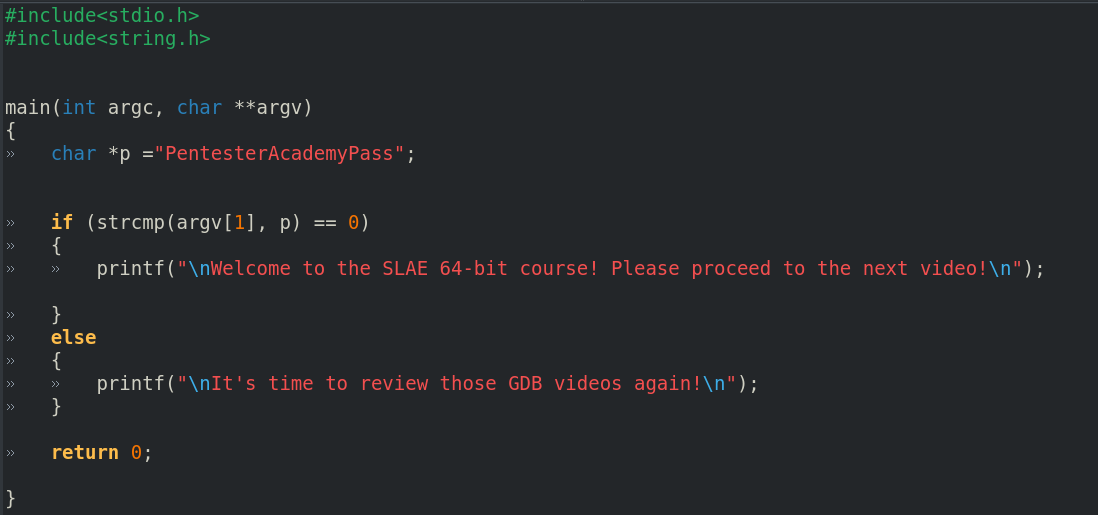
The contents of the program gdb_test.c are shown below:
#include<stdio.h>
#include<string.h>


main(int argc, char **argv)
{
	char *p ="PentesterAcademyPass";


	if (strcmp(argv[1], p) == 0)
	{
		printf("\nWelcome to the SLAE 64-bit course! Please proceed to the next video!\n");

	}
	else
	{
		printf("\nIt's time to review those GDB videos again!\n");
	}

	return 0;

}
The program contains a string variable called p that holds the password “PentesterAcademyPass”. It then does a string compare of the variable p with the first argument passed to the executable from the command line. If the first argument is the same string as p, the strcmp function returns a zero. The enveloping if statement checks for this condition and if true, executes the statement:
printf("\nWelcome to the SLAE 64-bit course! Please proceed to the next video!\n");
One way to crack this simple password checking routine is to run this program in GDB and trick the program into thinking that any randomly entered command line argument is the password. This is done by setting the register that contains the randomly entered password to the hardcoded password “PentesterAcademyPass” from within GDB. The executable then continues running thinking that the correct password was entered.
We will now demonstrate the entire process.
To do this, we need to first compile the program into an executable. The program is compiled with:
$ gcc -m32 -ggdb3 -zexecstack -mpreferred-stack-boundary=2 gdb_test.c -o gdb_test
This produces an executable called gdb_test.
In the next section, we run the executable gdbtest in GDB + GEF.
Running gdb_test in GDB + GEF#
The screenshot below shows the executable gdbtest being run in GDB + GEF.
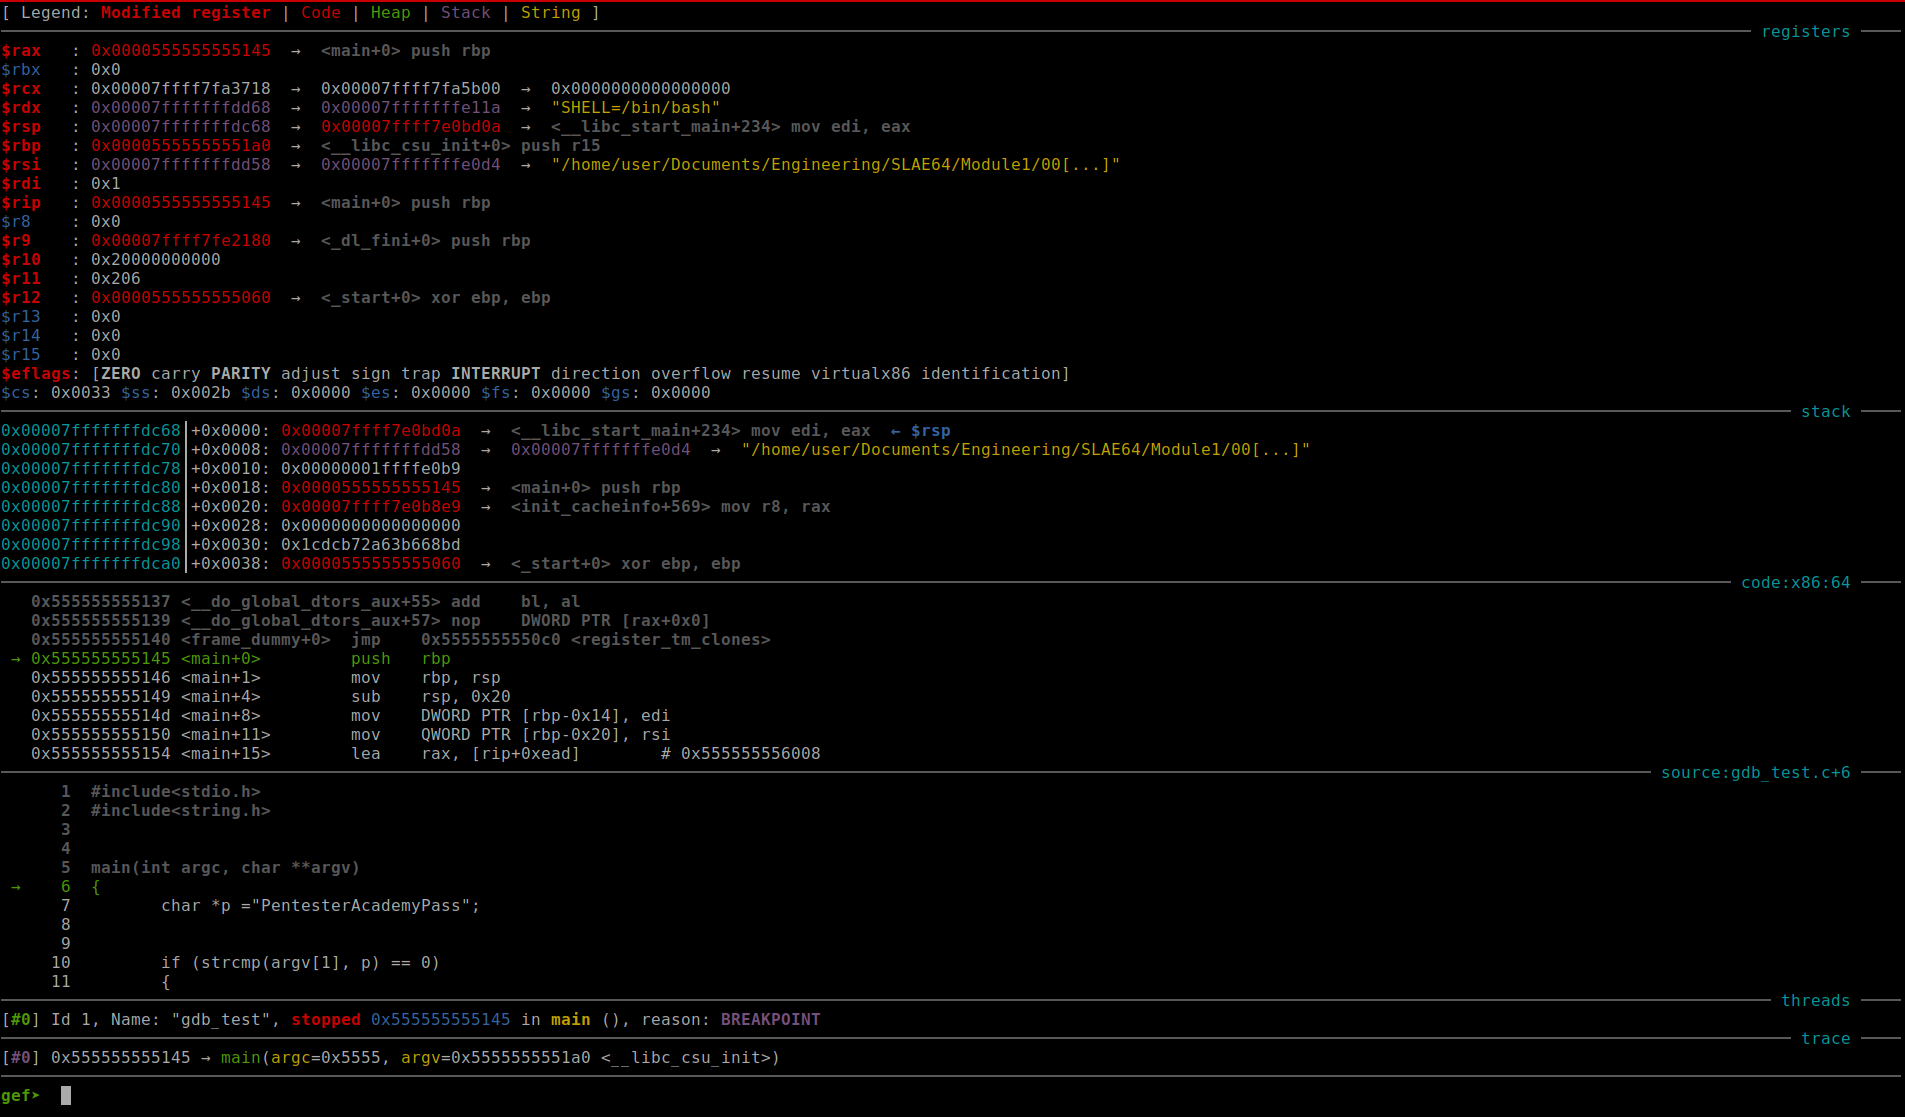
Fig. 46 Running gdb_test in GDB + GEF#
Examining the Disassembly of main in Detail#
In this section, we will examine the disassembly of the function main in more detail. We will use the ATT format to become accustomed to it, but generally, the Intel format seems to be more prevalent. In the screenshot below, we show the disassembly of the function main in both formats.
First we start with the ATT format…
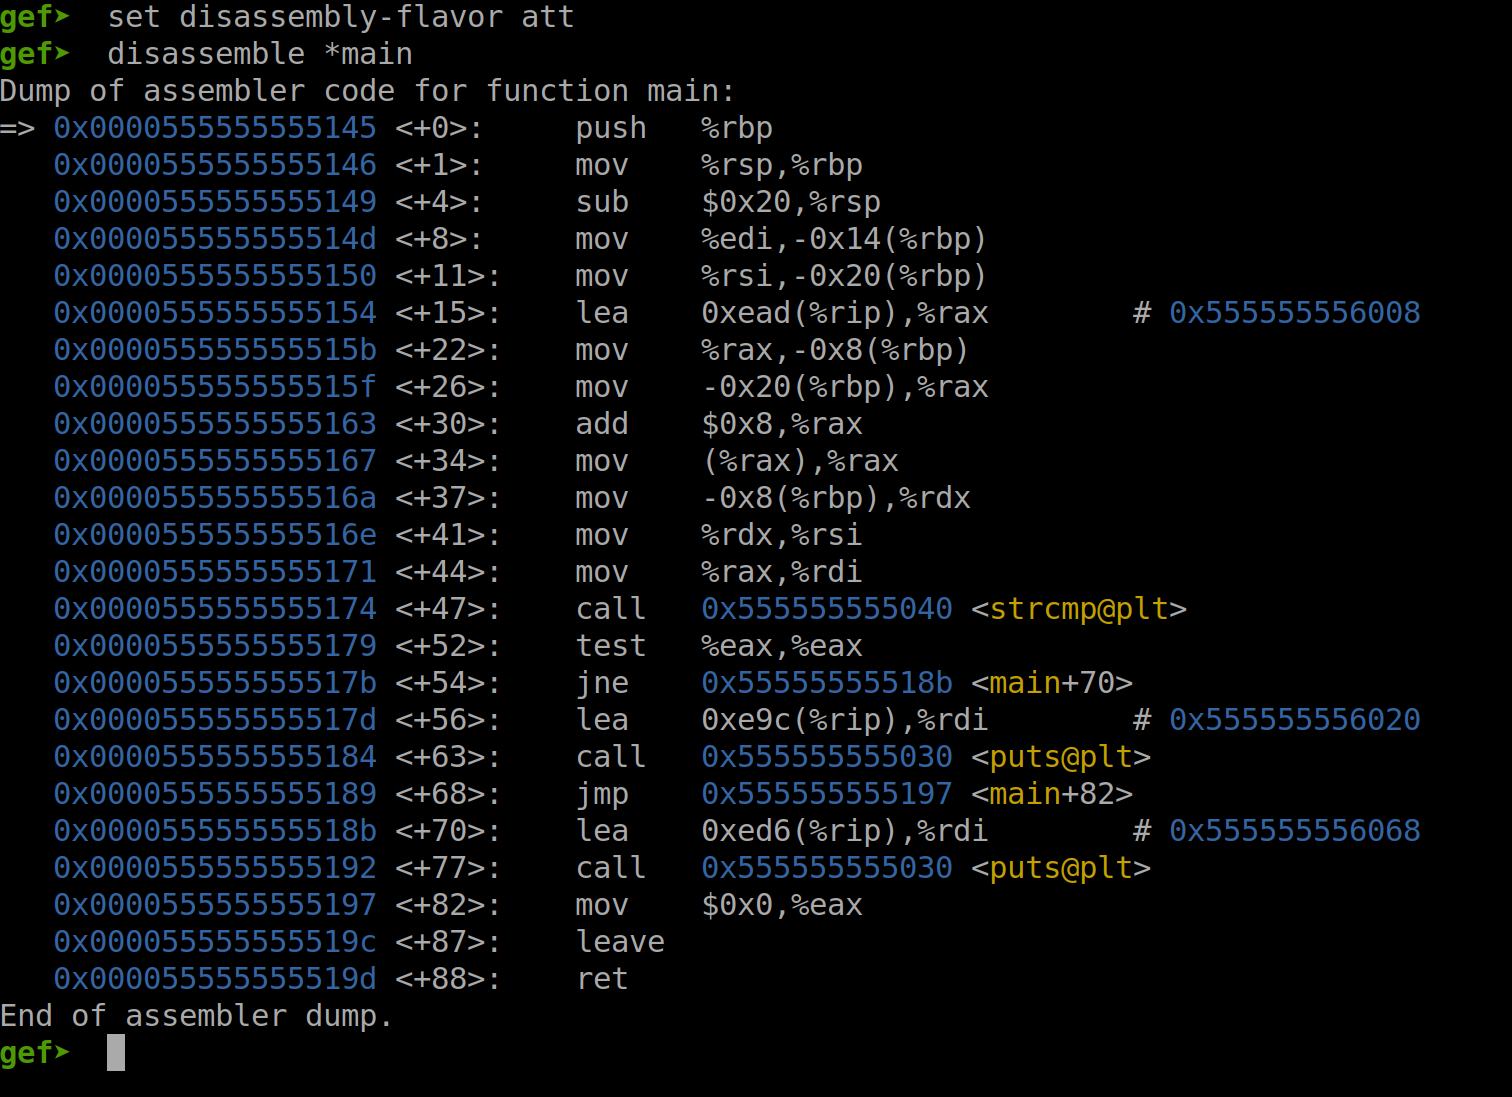
Fig. 47 Disassembly of the function main in the ATT Format#
Next, we display the disassembly of the function main in the Intel format.
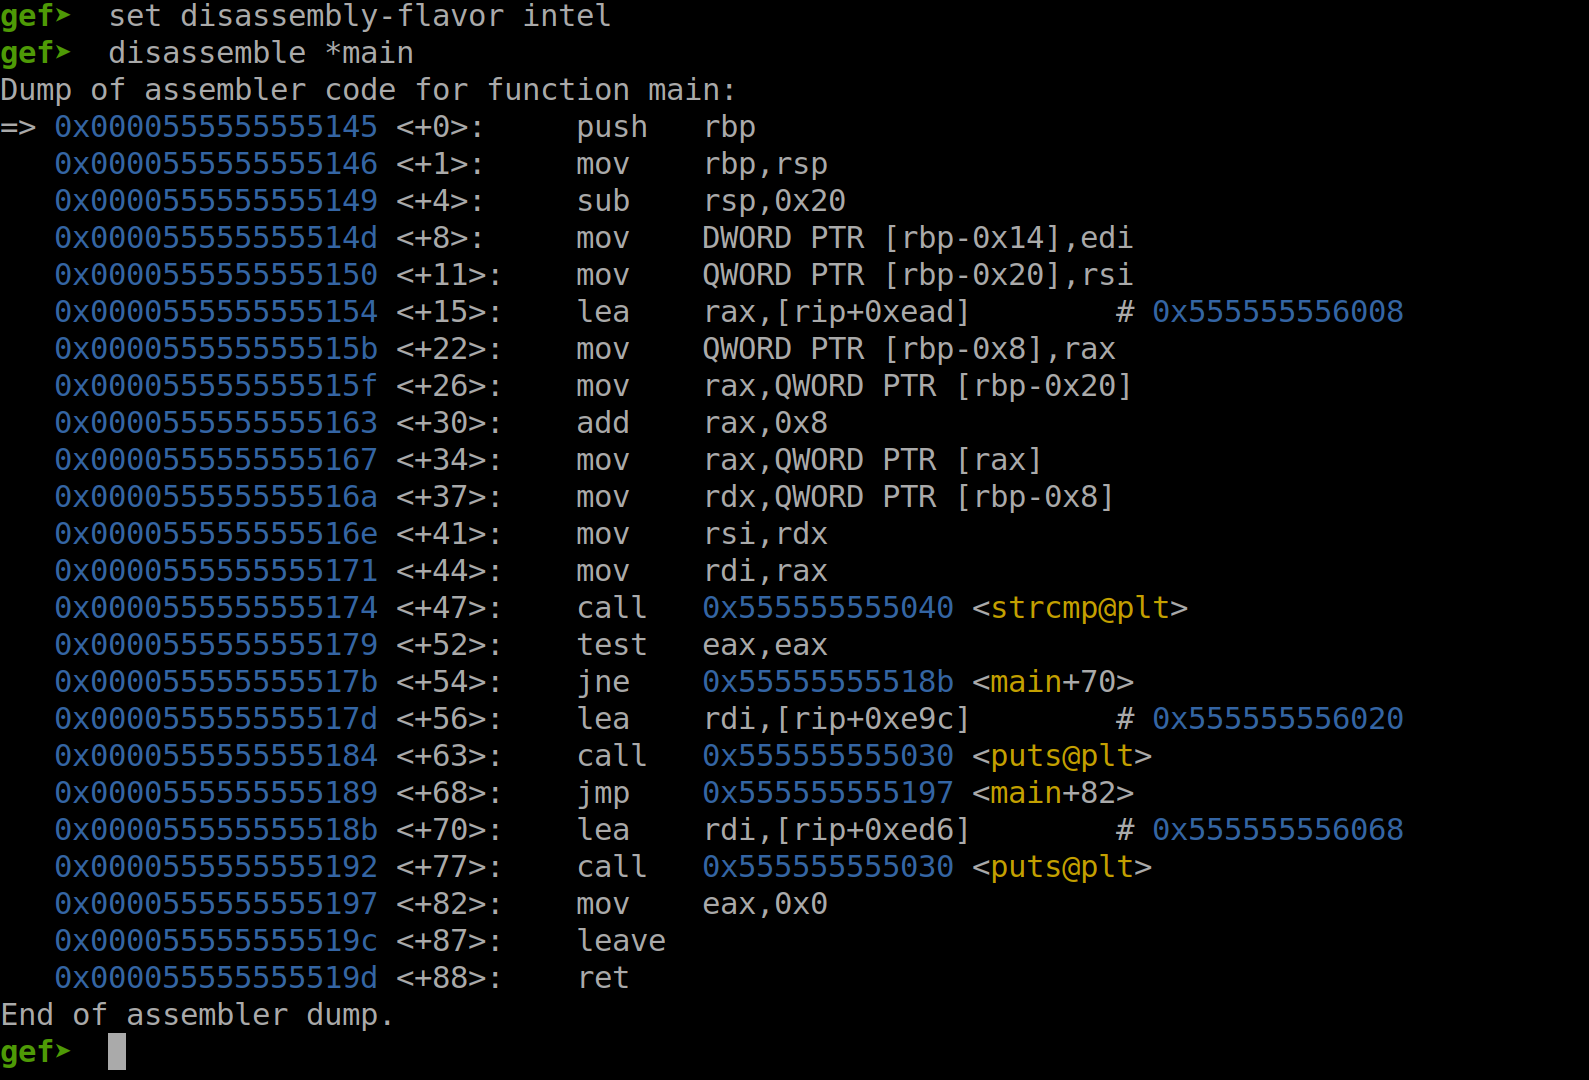
Fig. 48 Disassembly of the function main in the Intel Format#
In the next section, we will zoom in to the function main shown in ATT format for clarity.
Examining the Disassembly of Main in Detail in the ATT Format#
In the screenshot below, we can see the disassembly of the function main in ATT format and zoomed in for better viewing. When viewing the assembly instructions, one instruction stands out as particularly interesting. It is the string compare instruction, at main + 47. If we could alter the return value of this function to satisfy the test that indeed a correct password was entered, then we can crack this password checking program.
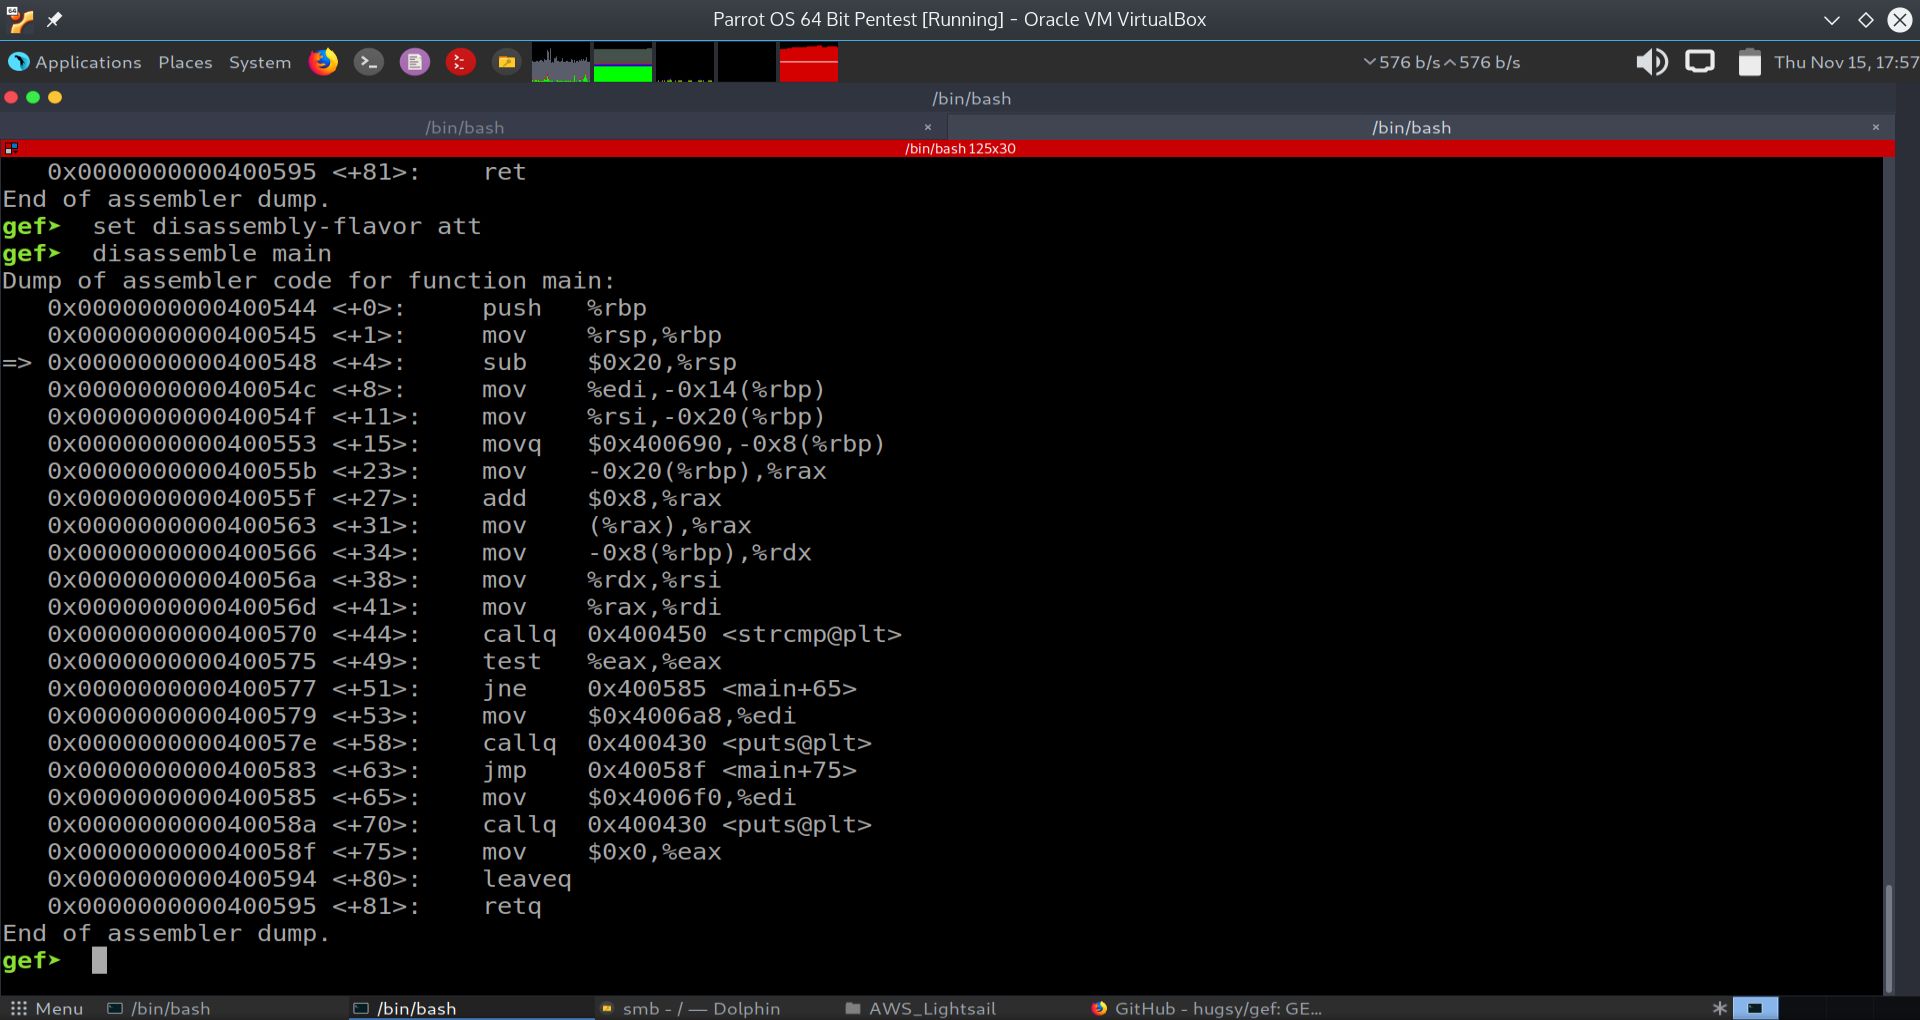
Fig. 49 Disassembly of the function main in the ATT Format Zoomed In#
In the next section, we will highlight the strcmp (string compare) instruction for clarity.
Highlighting the strcmp Instruction for Clarity#
In the screenshot below, we can see the disassembly of the function main and the strcmp (string compare) highlighted.
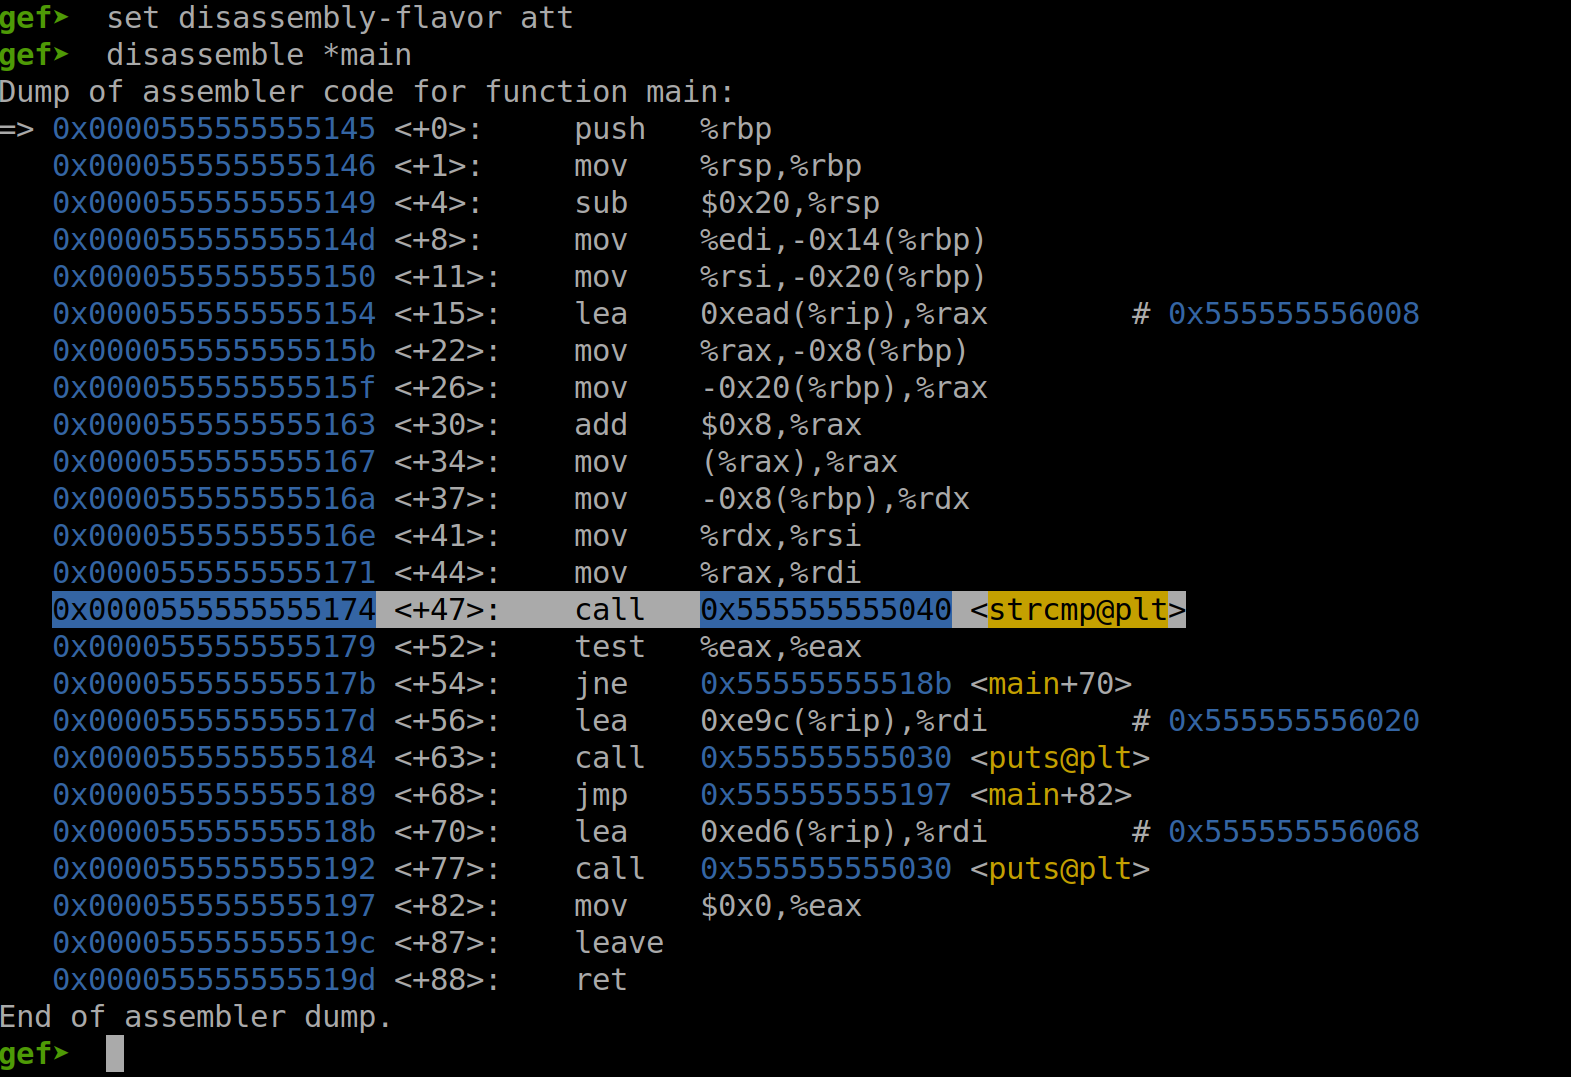
Fig. 50 Disassembly of the function main with the strcpy Instruction Highlighted#
In the screenshot above, we can see the disassembly of the function main and the strcmp (string compare) highlighted.
We see a couple of mov instructions prior to the string compare, and a test eax, eax instruction following it. The idea is that the strcmp function returns a zero into eax if the command line argument to the gdb_test executable matches the hardcoded password. If the strings match, then the test eax, eax instruction performs a bitwise AND on the operands and sets the zero flag if the strings matched. The result of the bitwise AND is not stored back into the register eax, only the zero flag is set.
After the test eax, eax instruction, we see a jne or a Jump if Not Equal instruction, and then a series of puts function calls. If the zero flag is not set, the program jumps to main+70, prints a string and then exits. If they are equal, the puts function call at main+63 executes and then jumps to main+82 near the end of the program.
We can see a graphical visualization of this with the help of Radare2.
Disassembly of the Function main in Radare2#
In the screenshot below, we disassemble the function main in Radare2
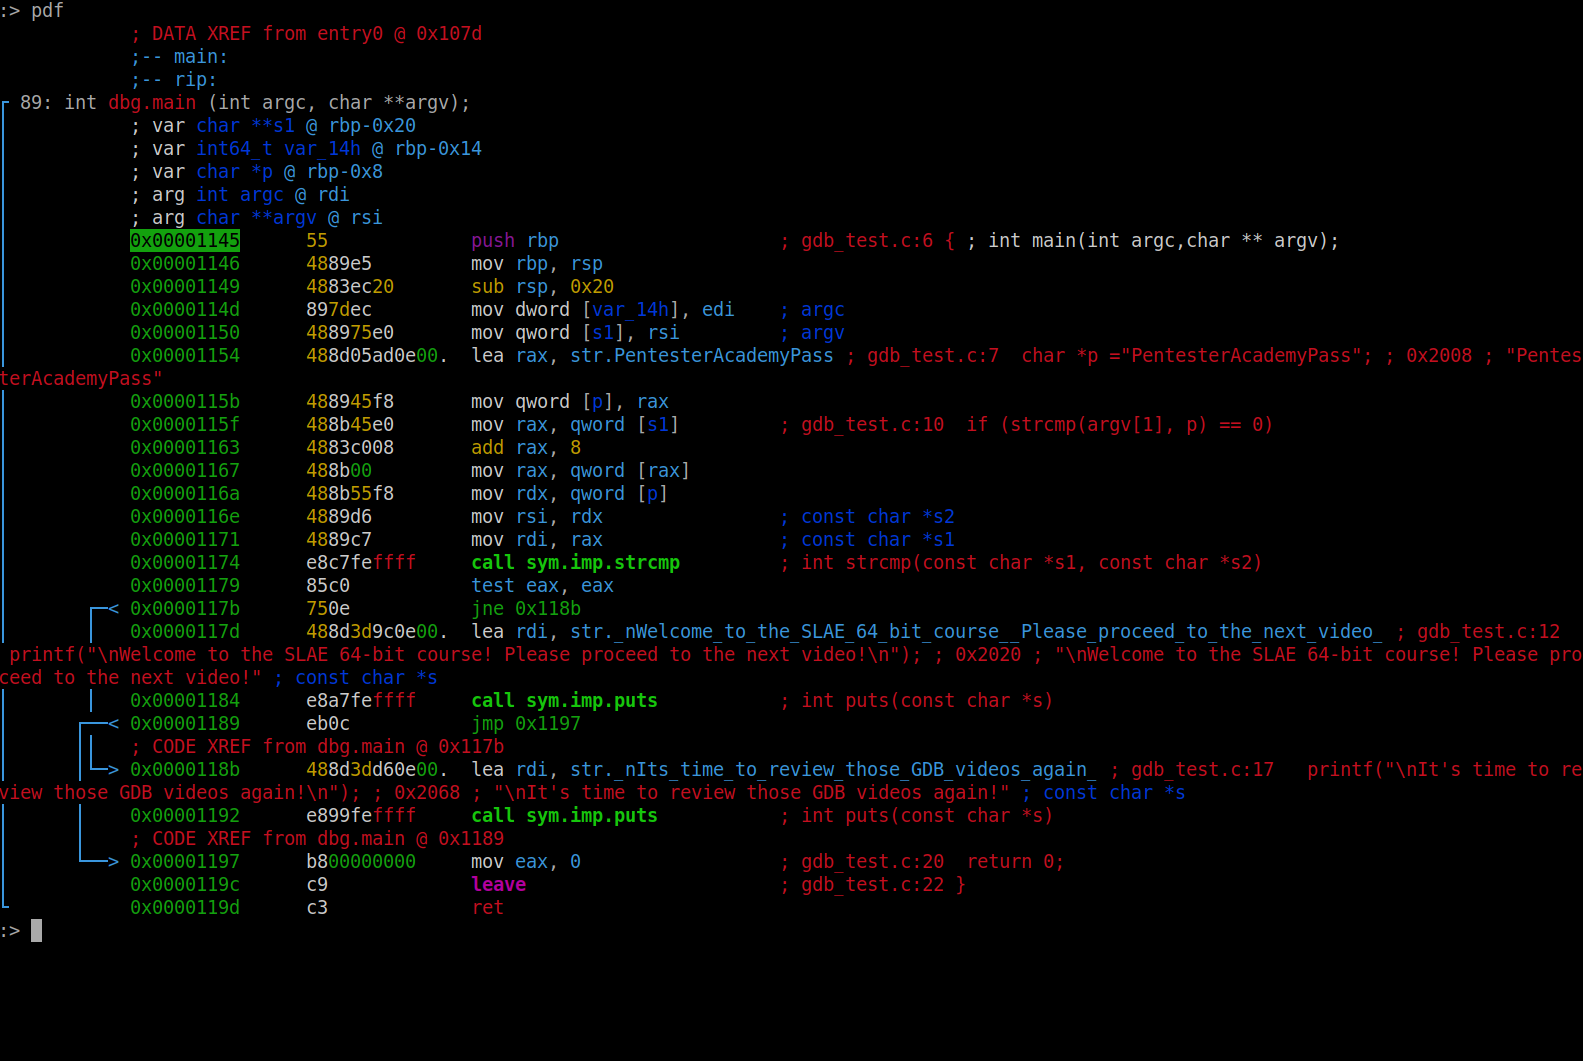
Fig. 51 Disassembly of the function main in Radare2#
In the screenshot above, we can see the disassembly of the function main in Radare2.
In Radare2, we can clearly see the flow graph of the branching after the test for zero in eax is performed. If we could modify eax to be a zero after this test, no matter what the command line argument was, then we can effectively always force the program to print the string that we want.
In the next section, we will setup a breakpoint just before the test eax, eax. Before executing this instruction, we will mov a zero into eax, effectively negating the results of the string compare. The program will then continue as if the correct password was entered, effectively being cracked.
Setting Up a Break Point at the Instruction test eax, eax#
In this section we will setup a breakpoint at just before the instruction test eax, eax. But first we must run the program with an arbitrary argument. We will use the string “AAAA” for its ease of recognition in either ASCII format or its hex equivalent, 0x41414141.
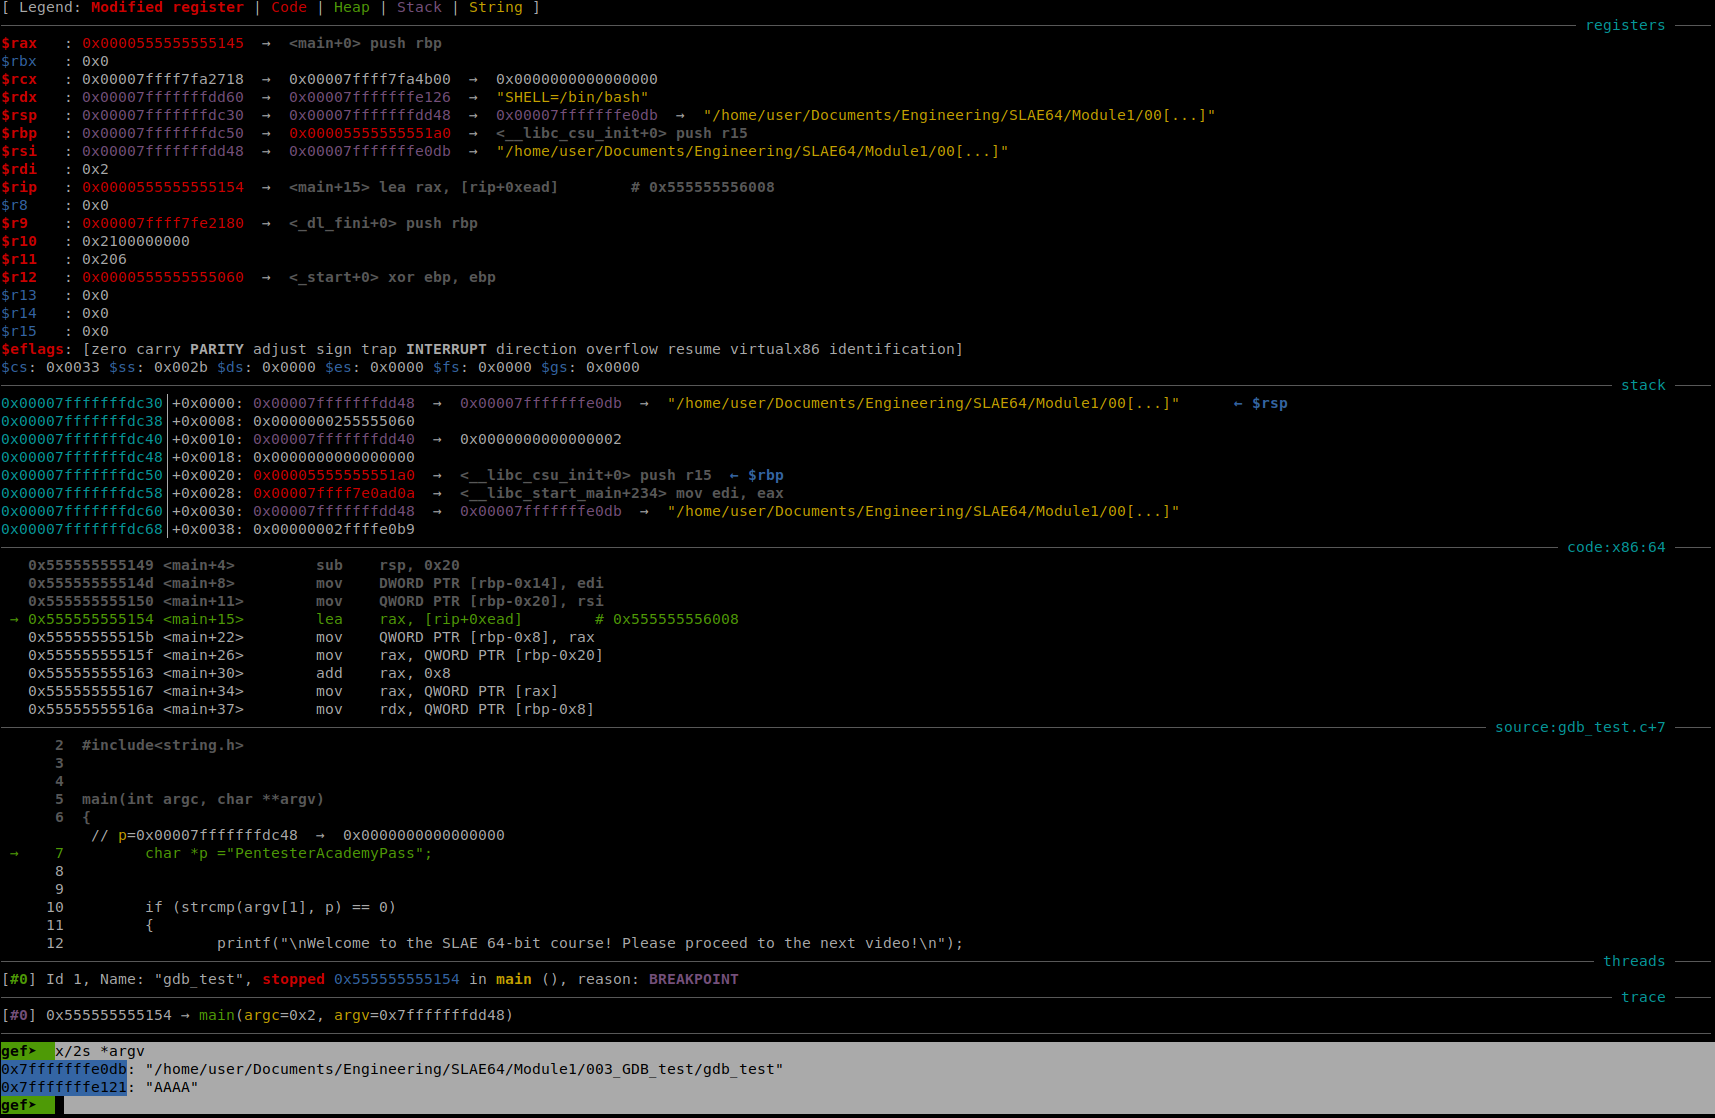
Fig. 52 Running gdb_test with the Argument AAAA#
In the screenshot above, we can see that gdb_test was run with the argument AAAA. This has been highlighted for clarity. The program will then execute a number of instructions that set up the stack for the local variables. We will not go into the details here in this section, because here will concentrate on using GDB to crack the program.
What is important to note is that the arguments to the vulnerable strcmp function are passed through the registers RDI and RSI. We will now set a breakpoint just before test eax, eax and also highlight RDI and RSI for clarity.
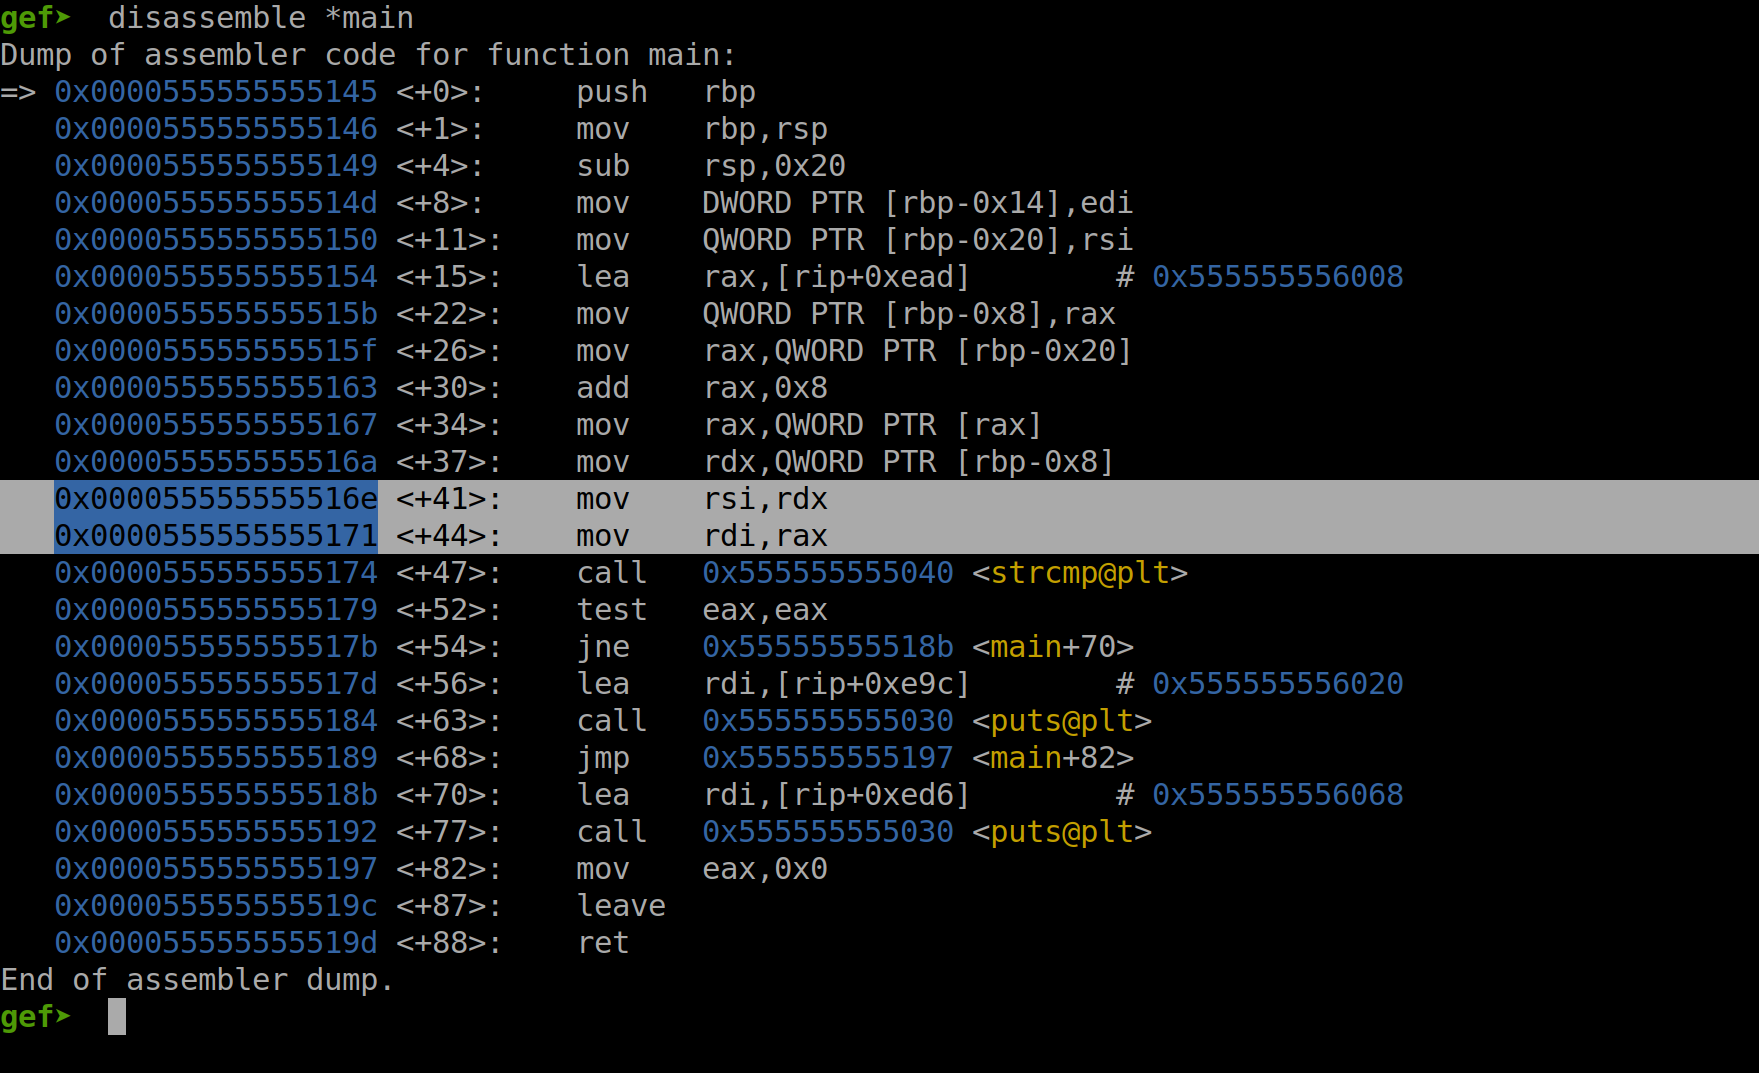
Fig. 53 Setting a Breakpoint Before test eax, eax#
In the screenshot above, we can see that a breakpoint was set at *main+52, which corresponds to the test eax, eax instruction. We can also see that the two lines prior to the strcmp call were highlighted, to emphasize that the arguments to strcmp are passed via the registers RDI and RSI, per calling convention.
We will now continue execution until the breakpoint at *main+52.
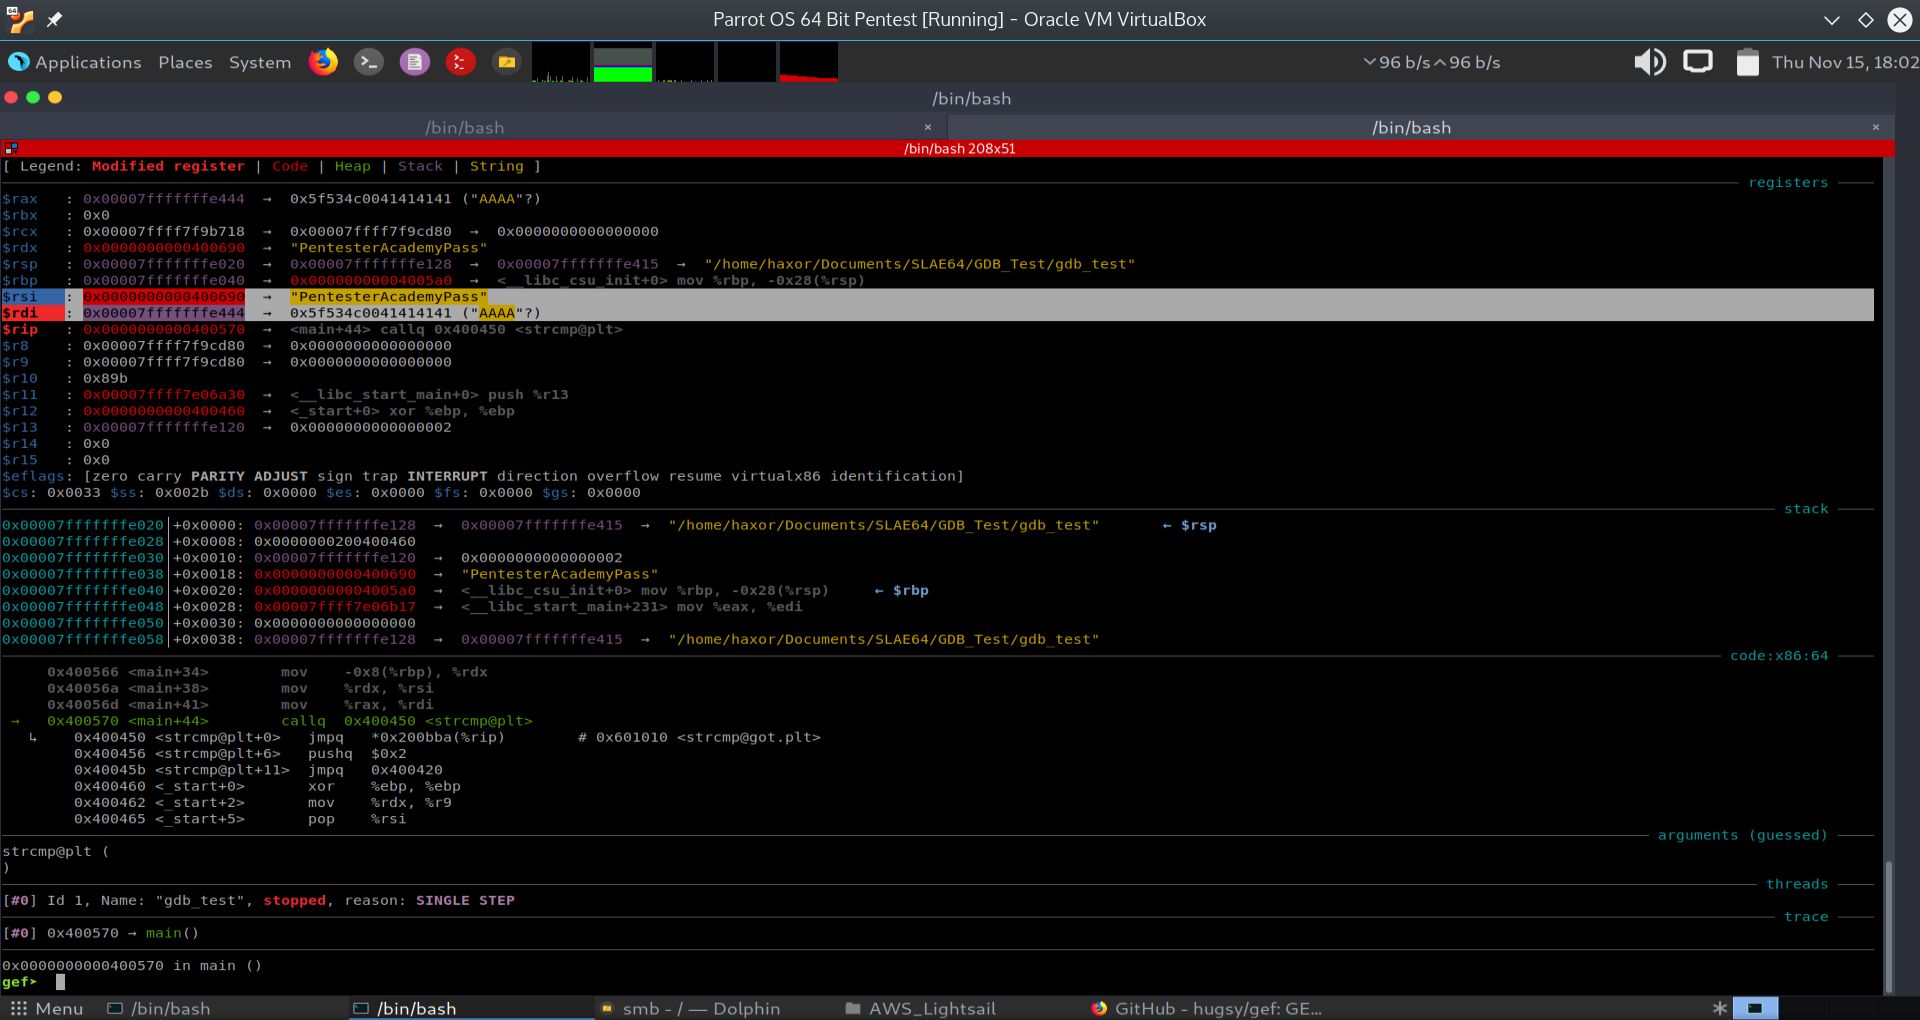
Fig. 54 Before strcmp Showing RDI and RSI Registers#
In the screenshot above, we can see that the breakpoint at *main+52 was hit. The arguments to strcmp are passed via the registers RDI and RSI, per calling convention. The RDI contains the memory address of the passed command line argument “AAAA”, while RSI contains the address of the hardcoded password “PentesterAcademyPass”.
The two strings pointed to RDI and RSI are obviously different. The result of the strcmp call will place a non-zero result into rax, as shown in the screenshot below:

Fig. 55 Result of strcmp Showing RAX#
We can see in the screenshot above that the result of the strcmp call results in a non-zero value being returned into the rax register. The next instructions is:
test eax, eax
What this instruction will do is to perform a bitwise AND operation on the register eax with itself. If eax contains zero, its bitwise and is also zero. This will set the zero flag and a subsequent jump operation can be performed based on the state of this flag.
What we want to do is to make the output of the strcmp function return a zero into the eax register, or just zero out the register eax using GDB prior to the test eax, eax instruction.
We choose to set the register rdi and rsi equal to each other using GDB. With this change, the output of the strcmp function call will return a zero into the register rax. This will effectively crack the password checking program.
In the next section, we will set the register rdi equal to rsi.
Setting the Register rdi Equal to the Register rsi Using GDB#
In the screenshot below, we use the GDB command:
set rdi=rsi
To set the registers rdi equal to the register rsi.
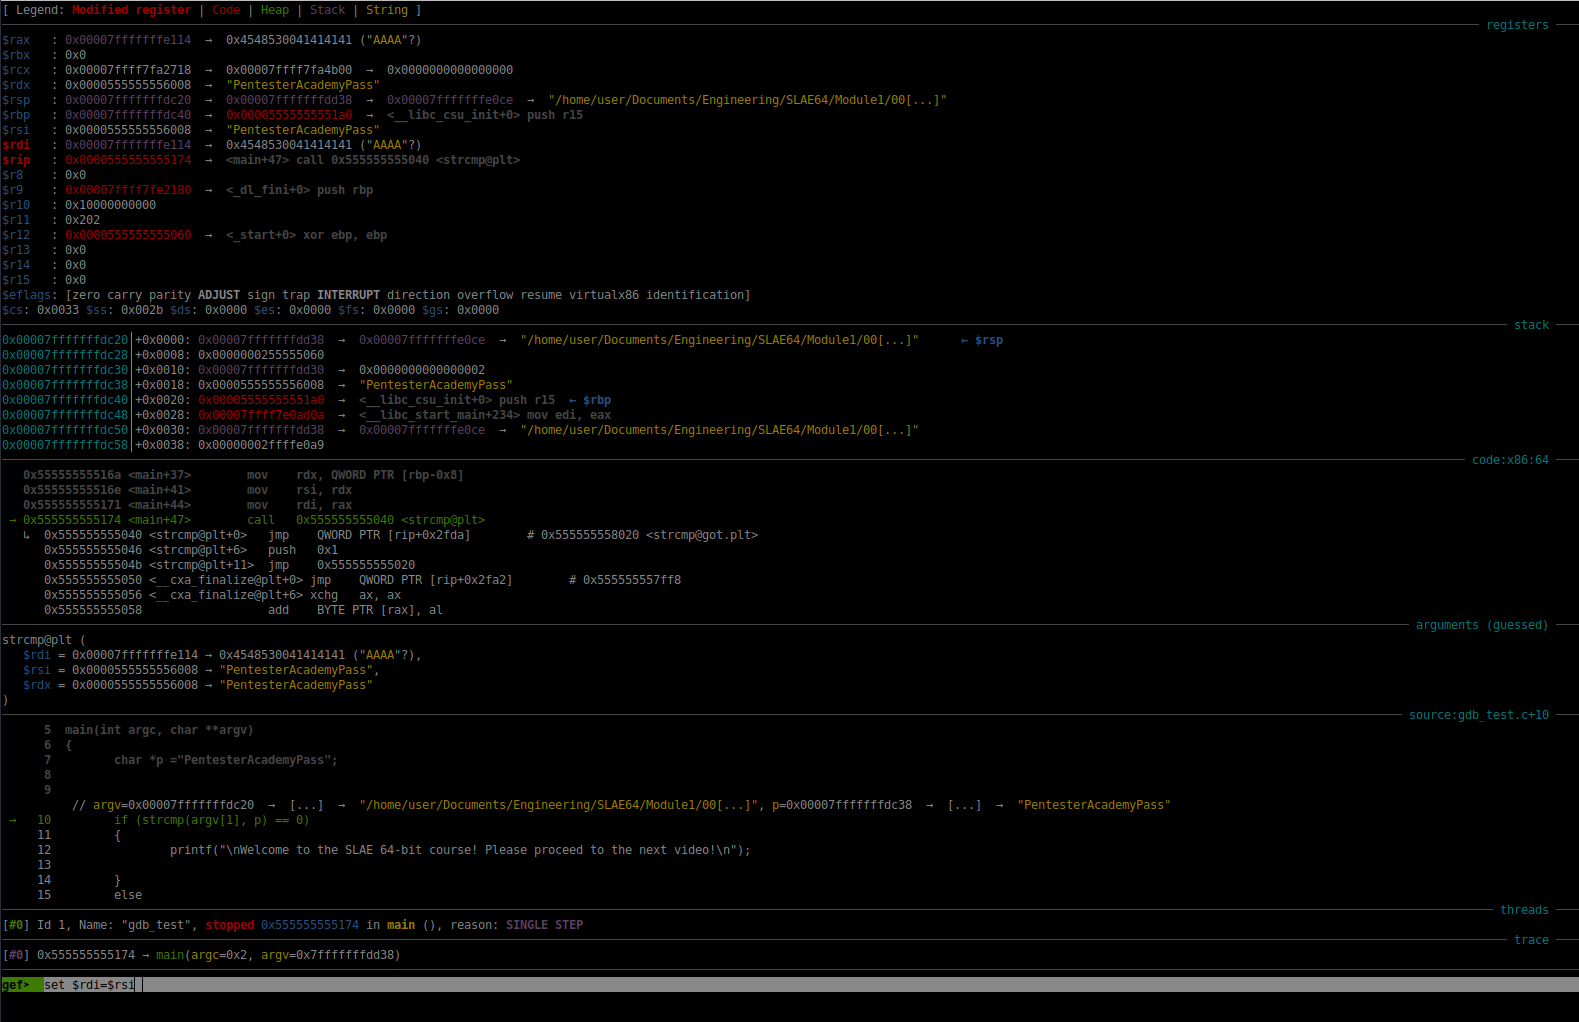
Fig. 56 Setting rdi Equal to rsi#
The result of this operation is shown in the screenshot below:
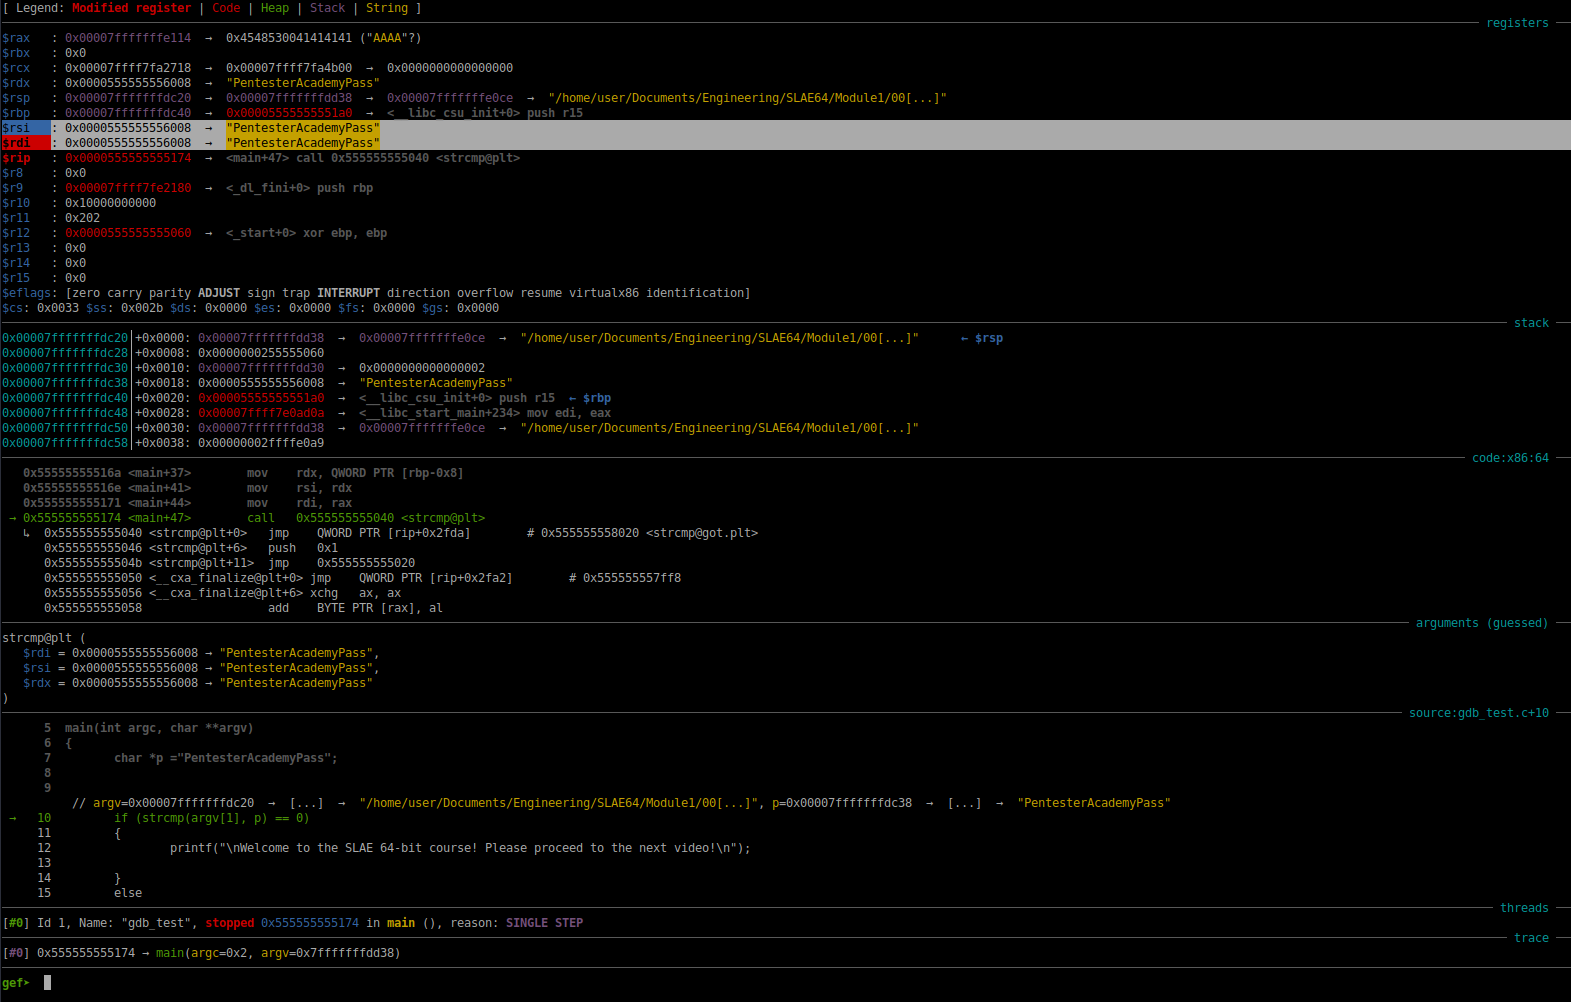
Fig. 57 Result of Setting rdi to rsi#
As we can see in the screenshot above, the register rdi has the same contents as the register rsi. When the strcmp function is executed, the result this comparison will result in a zero being returned into the register rax. Since there is a zero in rax, the test eax, eax instruction will cause the zero flag to be set. Following the test eax, eax instruction, we have the instruction:
jne 0x55555555518b <main+70>
This instruction will not be taken because the status of the zero flag is not equal to zero. The program execution then continues to the puts function call that will print the string that we are after. The program then jumps to the exit stage, at which time it exits gracefully. This is shown in the screenshot below:
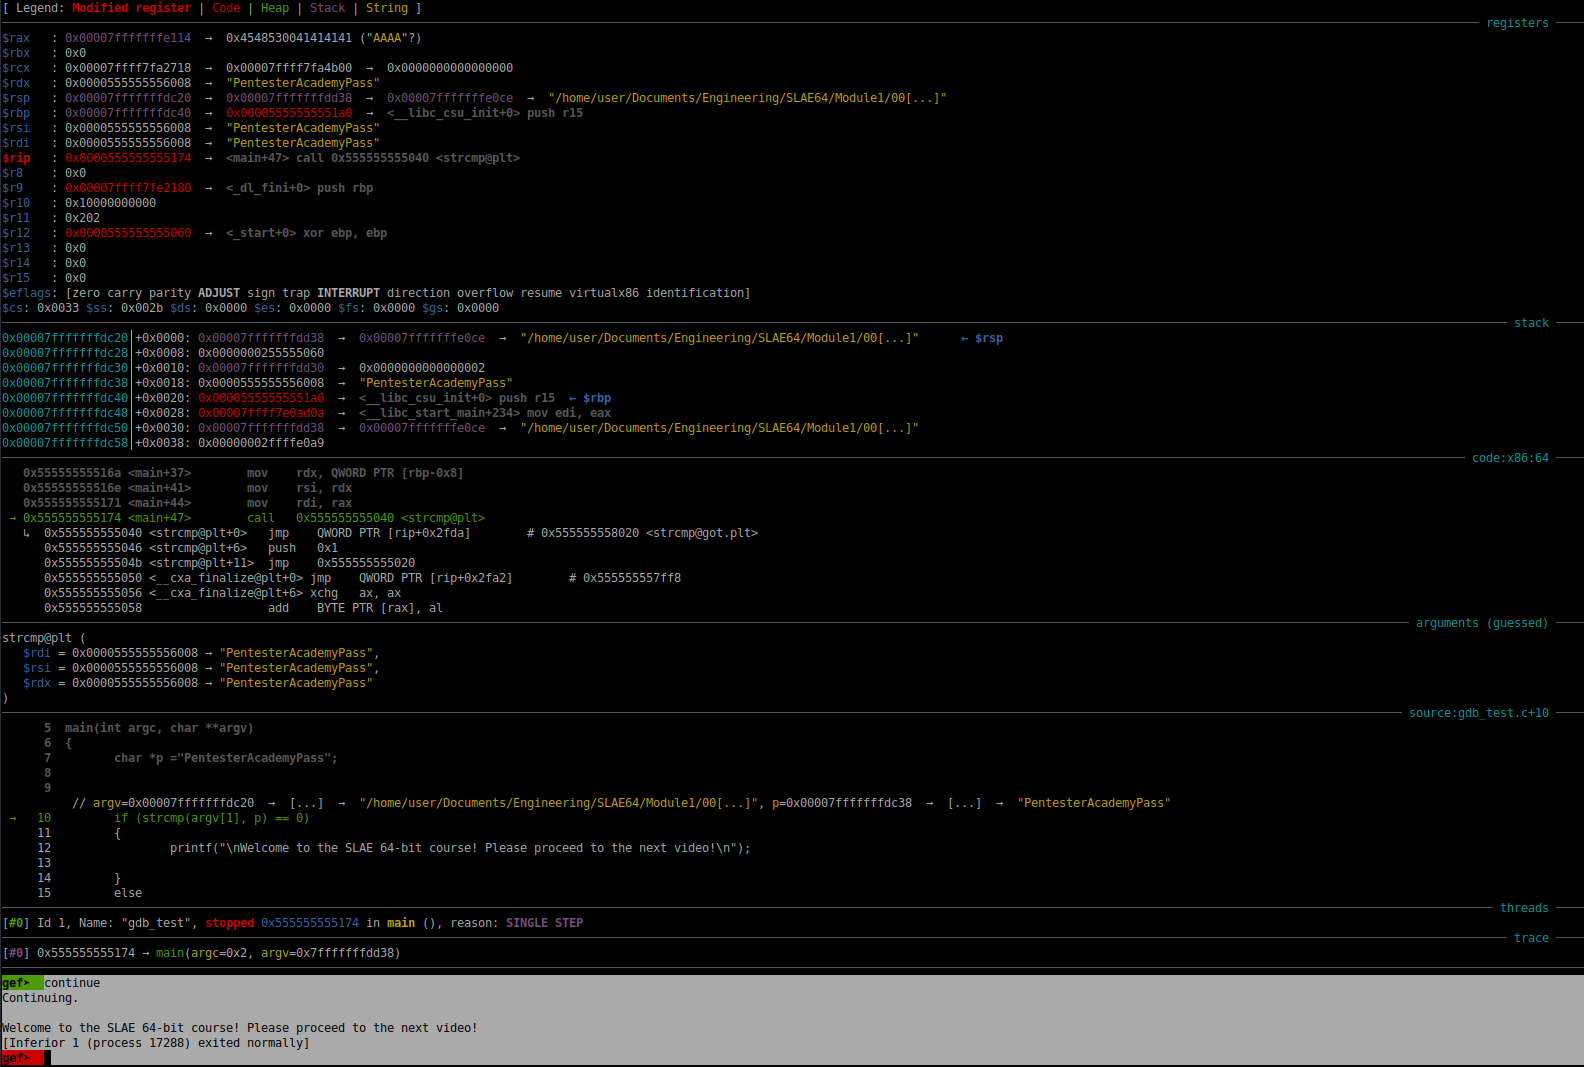
Fig. 58 Successful Hack of gdbtest#